Implement sorry pages using Cloudflare

High level overview

If your website is hosted behind cloudflare, you can take advantage of Its very highly available and scalable services like Cloudflare workers and Cloudflare KV to show the sorry/maintainance page to the users during the scheduled/unscheduled maintainace at your origin. Your users would hit their nearest cloudflare edge location so the sorry page would be served very fast. The sorry page content would be in the Cloudflare KV(Key Value) store and Cloudflare workers would fetch it from the KV to show to the user. Cloudflare APIs enable automation of your choice to implement the sorry page seamlessly.

This post has details on how to implement it manually on cloudflare portal as well via automation.

  1. Manual implemention (becuase we want to test if this works at all)
  2. Automation (because we want to avoid human mistakes and empower other teams to make the changes)
  3. Logging and Monitoring ( becuase no prod change is complete without logging and monitoring)

The setup

Its a very simple set up and potentially mimics a majority of deployments.

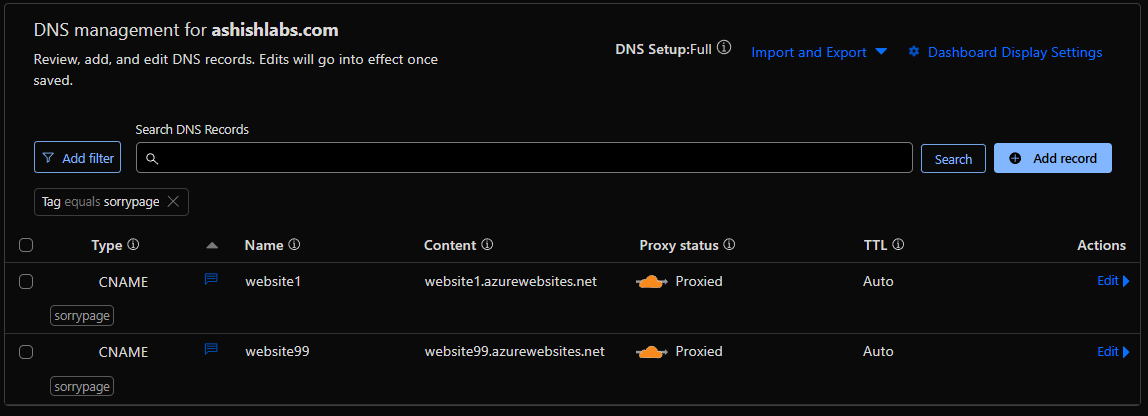
In this setup I have a zone ashishlabs.com which has two subdomains website1.ashishlabs.com and website99.ashishlabs.com which front
my websites on Azure app services – website1.azurewebsites.net and and website99.azurewebsite.net – aka the origins.
The origins accept requests only from Cloudflare IP addresses to prevent attackers bypassing Cloudflare and attacking the origin directly.

Cloudflare DNS management showing the subdomains and their respective origins and orange clouded – which means all the HTTP requests on website1 and website99.ashishlabs.com would hit cloudflare before going to their respective origins origin.

The setup with Cloudflare worker and KV

With this change, as usual user goes though cloudfare hitting Cludflare security protections first, then hitting cloudflare workers. Cloudflare worker then fetches the sorry page content and deliver to the user. The origins, Azure websites in this case does not serve any traffic.

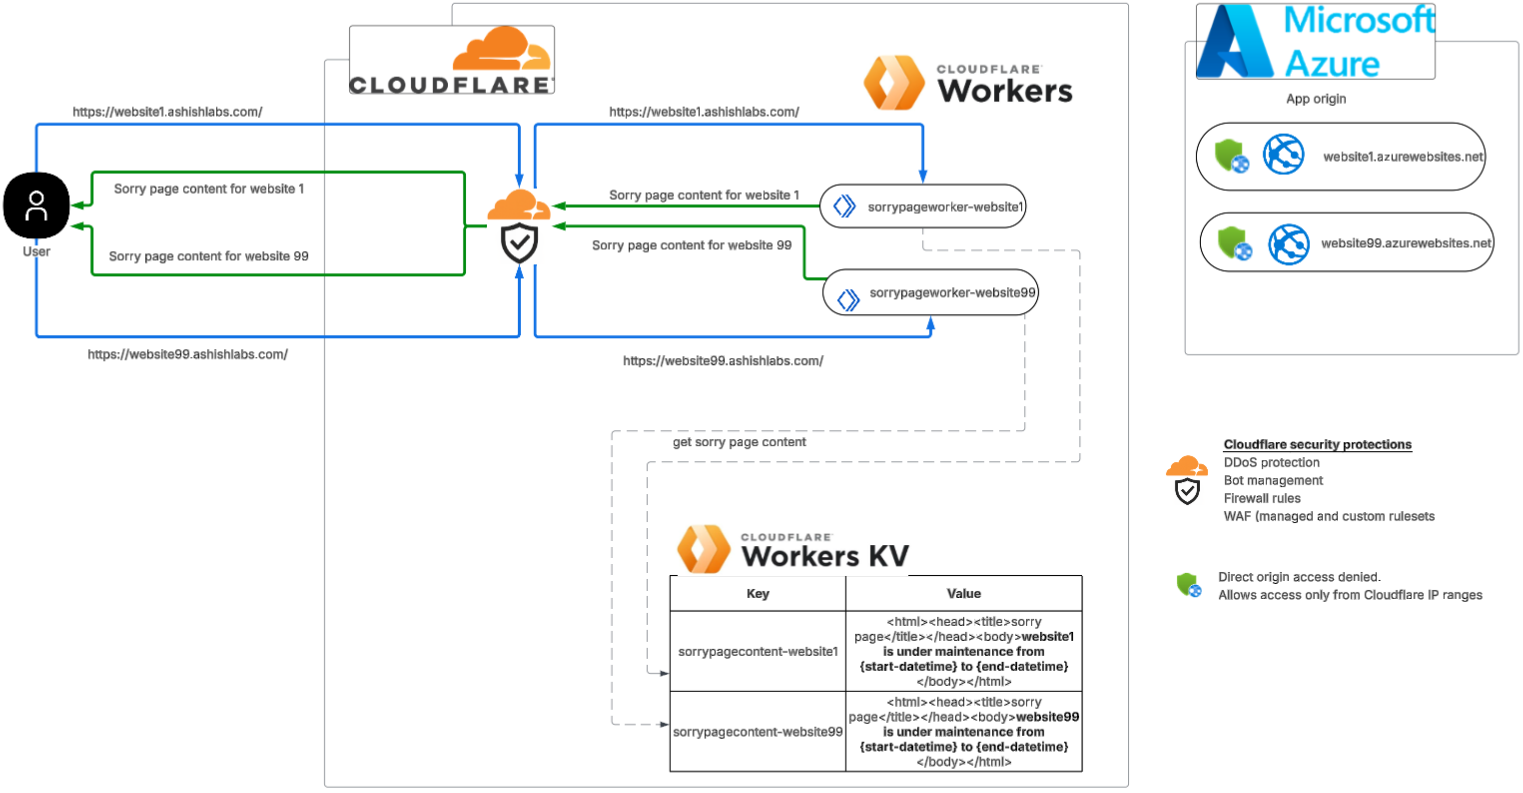
Above setup is can be broken down into below steps:

  • Create sorry page HTML content in Cloudflare KV
  • Create Cloudflare worker with javascript code which fetchs content from KV
  • Associate the worker with the zone via worker route

Create sorry page HTML content in Cloudflare KV

We need to first create a KV namespace.
On the Cloudflare account level, go to Storage & Databases > Workers KV

Click on “Create instance” and give a name

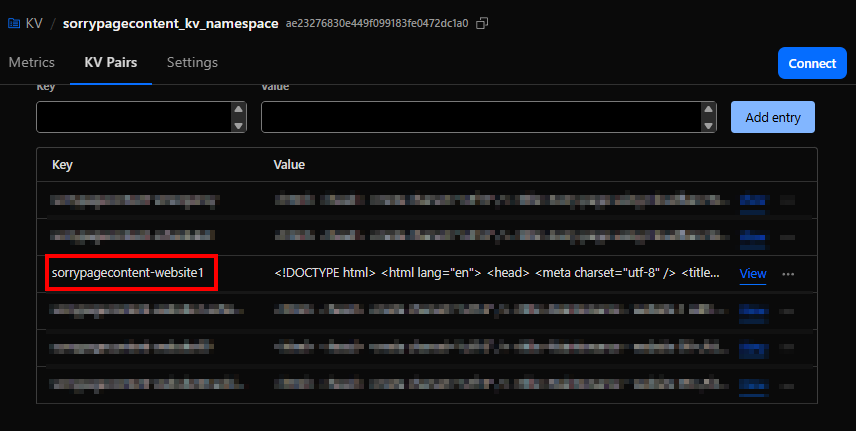
In the newly created namespace

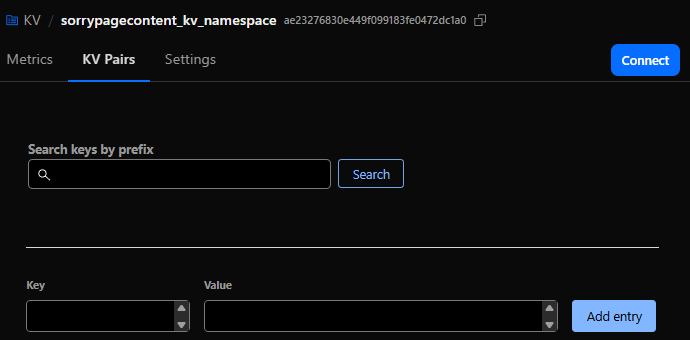
Add a key for the sorry page content and the HTML for the sorry page as the value and click on “Add entry”.

Create Cloudflare worker with javascript code

On Cloudflare account level go to Compute(Workers) > Workers & Pages.
Click Create.

you can use a template or existing github repo. In this example, I start with a “Hello World” example.

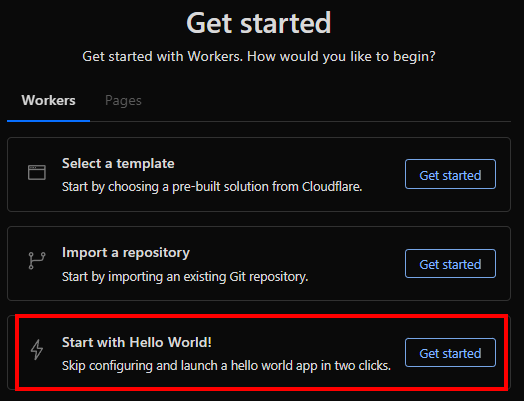
Give it a name “sorrypageworker1-website1” and deploy with sample code.

Click “Continue to project”

Click on “Add Binding”

Click on “KV namespace” on the left side and the click on “Add binding”.

Add a KV namespce binding by providing a name “SORRYPAGECONTENT1_KV_BINDING” and then selecting the namespace we created before and then click on “Add Binding”

Worker has now a binding to the KV to access the sorry page content.

Click on the “Edit code” icon to add your code.

The worker javascript

line 8 shows usage of the binding “SORRYPAGECONTENT1_KV_BINDING” we created to the KV to fetch the sorry page content by the key named “sorrypagecontent-website1”

// Worker code below which fetches the sorry page content from the KV store
export default {
  async fetch(request, env) {
    // Clone URL and force cache-busting (only at edge level)
    const url = new URL(request.url);
    url.searchParams.set("_maintenance", Date.now().toString());

    const html = await env.SORRYPAGECONTENT1_KV_BINDING.get("sorrypagecontent-website1", { type: "text" });

    if (!html) {
      return new Response("<html><body>Our website is currently undergoing scheduled maintenance.</body><html>", 
      {
         status: 200,
         headers: {
          "Content-Type": "text/html",
          "Cache-Control": "no-cache, must-revalidate, max-age=0, no-store, private",
          "Pragma": "no-cache",
          "Expires": "0",
          "CF-Cache-Status": "DYNAMIC"
        }
      });
    }

    return new Response(html, {
      status: 200,
      headers: {
        "Content-Type": "text/html",
        "Cache-Control": "no-cache, must-revalidate, max-age=0, no-store, private",
        "Pragma": "no-cache",
        "Expires": "0",
        "CF-Cache-Status": "DYNAMIC"
      }
    });
  }
}


Clicking on the refresh icon would run the worker which would fetch the content of the sorry page. After previewing. please click “Deploy” which will deploy the code to the worker.

Associate the worker with the zone via worker route

Now that we the the cloudflare worker created and tested, we can associate this worker to the zone.

Worker routes > “Add route”

Enter the route as below.
website1.ashishlabs.com/*
Select the worker we created before
sorrypageworker1-website1

/* in the route ensures any path under website1.ashishlabs.com would invoke the worker which ensures the user would see the sorry page for ALL paths under website1.ashishlabs.com

The woute is now added.

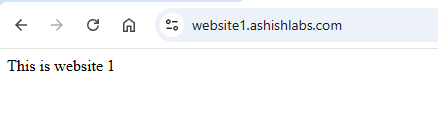
Access to website1.ashishlabs.com would now show the sorry page. In my tests Its from instant to 2 minutes after making route association.

Detach the worker from the website

On the account level, go to worker routes and click on the “Edit” for the route you want to detach.

Click “Remove”

Click “Remove” on the confirmation to remove the route.

Sorry page is now removed.

The automation of sorry pages

An approach could be to keep the worker, KV binding and KV store created before hand and then create the automation to do below things :

  1. Update the sorry page content in the KV.
  2. Attach/Detach the worker to the zone by attaching/detaching the route to bring up/bring down the sorry page.

Above would enable you bring up/down the sorry page with custom content as needed.

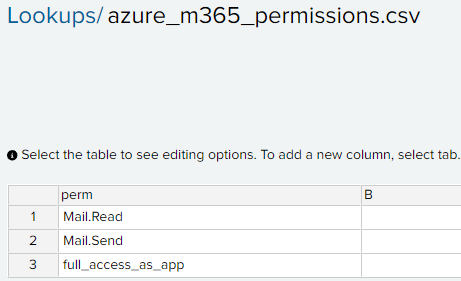
The API token and necessary permissions

On the account level, go to Manage Account > Account API token and create a custom token with below permissions.

Update the sorry page content in the KV

Below is a basic python script which updates the sorry page content from a local HTML file.
It needs below :

AccountId : Go to any zone and on the right side, you can see the account id.

KV Namespace Id : Go to the KV namespace where you have the sorry page content and get the ID from there.

KV key name : Get the KV key name which has the corresponding HTML content you want to update.

The python script

import requests
import sys

# Config - Please ensure these are not hardcoded in your script.
# They should be in config files or environment variables in the automation of your choice
CF_API_TOKEN = "<API-TOKEN>"
ACCOUNT_ID = "<CLOUDFLARE-ACCOUNT-ID>"
KV_NAMESPACE_ID = "<KV-NAMESPACE-ID>"  
KEY_NAME = "sorrypagecontent-website1"  
SORRY_PAGE_CONTENT_FILE = "sorrypage.html"  

def update_kv_value(account_id, namespace_id, key, value, api_token):
    url = f"https://api.cloudflare.com/client/v4/accounts/{account_id}/storage/kv/namespaces/{namespace_id}/values/{key}"
    headers = {
        "Authorization": f"Bearer {api_token}",
        "Content-Type": "text/plain"
    }
    response = requests.put(url, headers=headers, data=value.encode("utf-8"))
    return response.json()

if __name__ == "__main__":
    try:
        with open(SORRY_PAGE_CONTENT_FILE, "r", encoding="utf-8") as f:
            html_content = f.read()
            print(html_content)
    except FileNotFoundError:
        print(f"File {SORRY_PAGE_CONTENT_FILE} not found.")
        sys.exit(1)

    result = update_kv_value(ACCOUNT_ID, KV_NAMESPACE_ID, KEY_NAME, html_content, CF_API_TOKEN)
    print(result)

Script to attach/detach the route

# cf_worker_route_min.py
# Usage:
#   python cf_worker_route_min.py attach "website.ashishlabs.com/*" "sorrypageworker1-website1"
#   python cf_worker_route_min.py detach "website.ashishlabs.com/*"

import os, sys, json, requests
from typing import Dict, List

CF_API = "https://api.cloudflare.com/client/v4"
CF_API_TOKEN = "<CF_API_TOKEN>"

def h(token: str) -> Dict[str, str]:
    return {"Authorization": f"Bearer {token}", "Content-Type": "application/json", "Accept": "application/json"}

def hostname_from_pattern(pattern: str) -> str:
    return pattern.split("/", 1)[0].strip()

def list_all_zones(token: str) -> List[Dict]:
    zones, page = [], 1
    while True:
        r = requests.get(f"{CF_API}/zones", headers=h(token), params={"page": page, "per_page": 50})
        r.raise_for_status()
        data = r.json()
        zones += data.get("result", [])
        if page >= data.get("result_info", {}).get("total_pages", 1):
            break
        page += 1
    return zones

def best_zone_for_host(token: str, host: str) -> Dict:
    zones = list_all_zones(token)
    cand = [z for z in zones if host == z["name"] or host.endswith("." + z["name"])]
    if not cand:
        raise RuntimeError(f"No zone you own matches host '{host}'.")
    cand.sort(key=lambda z: len(z["name"]), reverse=True)
    return cand[0]

def worker_exists(token: str, account_id: str, script_name: str) -> bool:
    r = requests.get(f"{CF_API}/accounts/{account_id}/workers/scripts/{script_name}", headers=h(token))
    if r.status_code == 404:
        return False
    r.raise_for_status()
    return True

def list_routes(token: str, zone_id: str) -> List[Dict]:
    r = requests.get(f"{CF_API}/zones/{zone_id}/workers/routes", headers=h(token))
    r.raise_for_status()
    return r.json().get("result", [])

def create_route(token: str, zone_id: str, pattern: str, script: str):
    r = requests.post(f"{CF_API}/zones/{zone_id}/workers/routes", headers=h(token),
                      data=json.dumps({"pattern": pattern, "script": script}))
    r.raise_for_status()

def update_route(token: str, zone_id: str, route_id: str, pattern: str, script: str):
    r = requests.put(f"{CF_API}/zones/{zone_id}/workers/routes/{route_id}", headers=h(token),
                     data=json.dumps({"pattern": pattern, "script": script}))
    r.raise_for_status()

def delete_route(token: str, zone_id: str, route_id: str):
    r = requests.delete(f"{CF_API}/zones/{zone_id}/workers/routes/{route_id}", headers=h(token))
    r.raise_for_status()

def attach(token: str, pattern: str, script: str):
    host = hostname_from_pattern(pattern)
    zone = best_zone_for_host(token, host)
    zone_id = zone["id"]
    account_id = zone["account"]["id"]

    print("host : " + host)
    print("pattern : " + pattern)
    print("worker : " + script)

    if not worker_exists(token, account_id, script):
        raise RuntimeError(f"Worker '{script}' not found in account {account_id}.")

    routes = list_routes(token, zone_id)
    exact = [r for r in routes if r.get("pattern") == pattern]
    if not exact:
        create_route(token, zone_id, pattern, script)
        print("OK: route created")
        return

    r0 = exact[0]
    if r0.get("script") == script:
        print("OK: route already attached")
        return

    update_route(token, zone_id, r0["id"], pattern, script)
    print("OK: route updated")

def detach(token: str, pattern: str):
    host = hostname_from_pattern(pattern)
    zone = best_zone_for_host(token, host)
    zone_id = zone["id"]
    print("host : " + host)
    print("pattern : " + pattern)
    routes = list_routes(token, zone_id)
    exact = [r for r in routes if r.get("pattern") == pattern]
    if not exact:
        print("OK: nothing to detach")
        return
    for r in exact:
        delete_route(token, zone_id, r["id"])
    print("OK: route deleted")

def main():
    if len(sys.argv) < 3:
        print("Usage:\n  attach <route-pattern> <worker-name>\n  detach <route-pattern>", file=sys.stderr)
        sys.exit(1)

    op = sys.argv[1].lower()
    pattern = sys.argv[2]
    script = sys.argv[3] if op == "attach" and len(sys.argv) >= 4 else None

    token = CF_API_TOKEN
    if not token:
        print("Set CF_API_TOKEN", file=sys.stderr)
        sys.exit(2)

    try:
        if op == "attach":
            if not script:
                print("attach requires <worker-name>", file=sys.stderr); sys.exit(3)
            attach(token, pattern, script)
        elif op == "detach":
            detach(token, pattern)
        else:
            print("First arg must be attach or detach", file=sys.stderr); sys.exit(4)
    except requests.HTTPError as e:
        print(f"ERR: HTTP {e.response.status_code} {e.response.text}", file=sys.stderr)
        sys.exit(5)
    except Exception as e:
        print(f"ERR: {e}", file=sys.stderr); sys.exit(6)

if __name__ == "__main__":
    main()

Tests

Attaching the route

python .\manage-worker-route.py attach "website1.ashishlabs.com/*" "sorrypageworker1-website1"

Detaching the route

python .\manage-worker-route.py detach "website1.ashishlabs.com/*" "sorrypageworker1-website1"

Depending upon your requirements, you can build a UI like below to not only set up templates for sorry pages but also their association to the zones via workers.

Manage sorry page templates

Add, update, detete and preview sorry page content.

Attaching sorry page to the zones.

Important note:

Its a good thing that the the cloudflare security rule (WAF/Custom rules/Managed rules etc) are applied before the requests reach cloudflare workers. This means for example if you have OFAC countries blocked, they would be blocked before like before workers.

Logging and monitoring

If you are a Cloudflare Enterprise customer, you can easily set up logpush with logs going to your monitorng platform. Specifically for workers (for sorry pages or anything involving workers), you want to include the below fields in the HTTP Requests datasets.

ParentRayID
Ray ID of the parent request if this request was made using a Worker script.

WorkerCPUTime
Amount of time in microseconds spent executing a Worker, if any.

WorkerScriptName
The Worker script name that made the request.

WorkerStatus
Status returned from Worker daemon.

WorkerSubrequest
Whether or not this request was a Worker subrequest.

WorkerSubrequestCount
Number of subrequests issued by a Worker when handling this request.

WorkerWallTimeUs
The elapsed time in microseconds between the start of a Worker invocation, and when the Workers Runtime determines that no more JavaScript needs to run.

Additional note

Firewall rule is another quick and dirty way of implementing sorry pages. Unfortunately this is not available in the free plan.

All you need to do is to create a rule with custom HTML content with block action.
The drawback I saw with this approach is the response code – which could be only 4xx which is not what I wanted. Typically you want 503 – service unavailable which could be achieved with Cloudflare workers with a lot more flexibility.

Conclusion

Cloudflare workers is a great way to very quicly set up sorry pages without any dependency on your origin. Hopefully you found this port helpful.

Azure AD/ Entra ID apps : Restrict email permissions to specific mailboxes

There are scenarios when a datacenter hosted app or a cloud hosted app needs access to one or more Exchange Online mailbox.
In such cases, typically an Azure AD app is created with permissions to read/write access to mailboxes/calendars and contacts.
Issue here is by default the access is provided for ALL the mailboxes. If an attacker gets holds of the app, the could potentially access emails from sensitive mailboxes and exfilter them.

The setup

The Azure AD app with mail.read/mail.send permissions.
The credential (secret) has been created for this app and used by a service app named “service1” .
The service1 app will read email from the mailbox service1.mailbox@redteamsimulation.com.

However, one can make use of the credentials for this Azure AD app to get emails from not only originally intended mailbox for the service but also sensitive mailboxes such as those of CEO and CFO as you can see in the below screenshot.

Code to get emails from all the mailboxes

Prerequisites : Install and import ExchangeOnlinemanagement module and Microsoft.Graph modules

Install-Module ExchangeOnlineManagement
Import-Module ExchangeOnlineManagement
Install-Module Microsoft.Graph
Import-Module Microsoft.Graph
# Import the required module
Import-Module Microsoft.Graph
$err_string= ''
# Set the necessary variables
$clientId = "7477abb4-xxxx-xxxx-xxxx-xxxxxx"
$tenantId = "c2b84b0b-xxxx-xxxx-xxxx-xxxxxxx"
$ClientSecretCredential = Get-Credential -Credential $clientId

# Connect to Microsoft Graph
Connect-MgGraph -TenantId $tenantId -ClientSecretCredential $ClientSecretCredential -NoWelcome

# Get all users in the tenant
$users = Get-MgUser

# Loop through each user
foreach ($user in $users) {
	# Get the user's mailbox
	try {
		$mailbox = Get-MgUserMailFolderMessage -UserId $user.Id -MailFolderId 'Inbox' -ErrorAction Stop
		$test = $user.Mail
		write-host "####### Reading emails for mailbox " -nonewline
		write-host $test -foreground red -nonewline
		write-host " ##########" 
		write-host "Found " -nonewline
		write-host $mailbox.Length -foreground red -nonewline
		write-host " email(s) " 
		foreach ($message in $mailbox) {
			# Print the message subject and received date
			Write-Output (" ----------------------------------------------------")
			Write-Output ("Subject: " + $message.Subject)
			Write-Output ("Received: " + $message.ReceivedDateTime)
			$body = $message.Body.Content -replace '<[^>]+>',''
			$body = $body.trim()
			Write-Output ("Body: " + $body)
		}
	write-host "`n"
	}
	catch
	{ 
		$err_string = $_ | Out-String
	}
	if ($err_string -inotmatch "The mailbox is either inactive, soft-deleted, or is hosted on-premise")
	{
		Write-Host $err_string
	}
}
# Disconnect from Microsoft Graph
Disconnect-MgGraph

Limiting access to only certain mailboxes

Below powershell will :
a) Create a mail-enabled security group with the mailbox we want to only allow to be accessed from the app.
b) Create an application access policy for the app with access restricted to only the mail enabled group created in step a)

$MailEnabledDistGroup=New-DistributionGroup -Name "Service1-RestrictedDistGroup" -Type "Security" -Members "service1.mailbox@redteamsimulation.com"
New-ApplicationAccessPolicy -AppId <AppId> -PolicyScopeGroupId $MailEnabledDistGroup.Id -AccessRight RestrictAccess -Description "Mailbox restrictions"

In my tests, the application access policy took effect in 60-90 minutes and after that accessing other mailboxes would give an error.
Below is the output running the same script as above.

Getting a handle on Azure AD/ Entra ID apps and their permissions

Midnight blizzard attack on Microsoft involved abuse of permissions on Azure AD/OAuth apps. Therefore, Its important to take stock of all the apps and their permissions and evaluate if we need those permissions and reduce them if we can.

Per the post, the attacker abused Office 365 Exchange Online full_access_as_app role, which allows access to mailbox. However, Microsoft Graph API also allows an app to use privileged mail.read/mail.write/mail.readwrite which can be abused to have similar effect.

This post has details on how to get all the apps and their permissions and potential way to prevent/detect.

What are Azure AD / Entra ID apps

On a high level, you can use Azure AD app to access any resources in Azure and M365 and that includes emails as well.

When you create an Azure AD application, you’re essentially registering your application with Azure AD, obtaining an application ID (also known as client ID) and optionally a client secret or certificate for authentication purposes and permissions to authorize them to access resources. This allows your application to authenticate users against Azure AD and access resources on behalf of those users.

Because attackers can abuse the high privileged permissions on Azure AD app to access Azure/M365 , It’s important to govern the apps and their permissions and below are few ways :

  • Get all the Azure AD apps and their permissions
  • Do we even need that “prod” Azure AD app?
  • Do we really need those permissions on the “prod” Azure AD app?
  • Apply conditional access policy on the apps e.g. IP restriction
  • Apply restrictions on domain users to register Azure AD/Entra apps
  • Understand roles and users in those roles which can manage Azure AD applications
  • Splunk monitoring and detection

Get all the Azure AD apps and their permissions

Powershell script to export all the azure AD apps and their permissions

Install the Azure AD module.
install-module azuread

# Connect to Azure AD
Connect-AzureAD

# Get all Azure AD applications
$allApps = Get-AzureADApplication -All $true
$array = @()
# Loop through each application
foreach ($app in $allApps) {
    Write-Host "Application Name: $($app.DisplayName)"

    # Get the required resource access (application permissions)
    $appPermissions = $app.RequiredResourceAccess | ForEach-Object {
        $resourceAppId = $_.ResourceAppId
        $resourceSP = Get-AzureADServicePrincipal -Filter "AppId eq '$resourceAppId'"
        $_.ResourceAccess | ForEach-Object {
            $permissionId = $_.Id
            $permissionType = $_.Type
            $permission = $null
			#$resourceSP
            if ($permissionType -eq 'Role') {
                $permission = $resourceSP.AppRoles | Where-Object { $_.Id -eq $permissionId }
            } elseif ($permissionType -eq 'Scope') {
                $permission = $resourceSP.Oauth2Permissions | Where-Object { $_.Id -eq $permissionId }
            }

            if ($permission) {
                [PSCustomObject]@{
                    'Application Name' = $app.DisplayName
					'API' = $resourceSP.DisplayName
                    'Permission Name' = $permission.Value
                    'Permission Description' = $permission.Description
                    'Permission Type' = $permissionType
                }
            }
        }
    }
	$array+=$appPermissions
    # Output the permissions
    #$appPermissions | Format-Table
}
$array | Export-Csv "output.csv"

The CSV file generating the below output :

  • Application Name
  • API
  • Permission Name
  • Permission Description
  • Permission Type (“Role” means application permissions and “Scope” means delegated permissions

Splunk output

If you are using Splunk and using ingesting the activity logs from M365 using Splunk Add-On for Microsoft 365, you can use below query to get all the app role assignments.

 index="o365" Operation="Add app role assignment to service principal."
| spath path=ModifiedProperties{}.NewValue output=NewValues
| spath path=Target{}.ID output=NewTargetValues
| eval _time = strptime(CreationTime, "%Y-%m-%dT%H:%M")
| eval AppName = mvindex(NewValues, 6)
| eval perm = mvindex(NewValues, 1)
| eval permdesc = mvindex(NewValues, 2)
| eval target = mvindex(NewTargetValues, 3)
| table _time, AppName, perm, target
| stats values(perm) as AllAPIPermissions, values(target) as API by AppName

Using MSIdentityTools

Mr. Merill Fernando [Principal Product Manager, Entra ] released a fantastic video for the update in the MSIdentityTool to generate the apps and permissions. Works like a charm.

Do we even need that “prod” Azure app?

Now that you have the list of the apps from the script above, you want to chedk if the apps in the list are even being used.
Login to Microsoft Entra Admin Center > Monitoring & Health > Service Principal sign-ins > Filter for last 7 days
If its a production app, and if they are not in the sign-in events screen for last 7 days, you want to ask the app owners if this app is needed any more. Get the email confirmation and remove the app.

Do we really need those permissions on the “prod” Azure AD app?

Sometimes, apps are assigned permissions which they really dont need. For example, mail.send/mail.read/mail.readwrite are assigned to an app to work with couple of mailboxes. However, the permissions are meant to work with ALL mailboxes and can be abused by an attacker.

Implement Conditional Access for Azure AD apps

Azure AD apps do not honor the conditional access policies to enforce IP restriction, for example. A potential solution is to use Microsoft Entra Workload ID premium feature.

Apply restrictions on domain users to register Azure AD/Entra apps

Login to Azure portal > Microsoft Entra ID > User settings.
Ensure the “User can register applications” is set to “No”.

This takes out the risk of a domain user registering an app and giving it permissions – although an admin still needs to grant consent on it.
Having said that, even with the above setting in place there are roles which can register applications. An example below is role “Application developers”.

This is another reason why best security practices should need to be applied for the privileged roles.

https://learn.microsoft.com/en-us/entra/identity/role-based-access-control/privileged-roles-permissions?tabs=admin-center

Understand roles and users in those roles which can manage Azure AD applications

Apart from the “Application developer” role which can register Azure AD apps, below two are privileged roles which can add/update credentials to an existing Azure AD apps as well. So, if the attacker compromises users in the below roles, they can quickly escalate privileges by adding credentials to an existing Azure AD app which has high privileges like  full_access_as_app role or mail.read/send and exfilter emails out of mailboxes.

Therefore, we should be careful assigning these roles and if absolutely needed ensure they arew cloud-only accounts with MFA turned on.

  • Application Administrator
  • Cloud Application Administrator

https://learn.microsoft.com/en-us/entra/identity/role-based-access-control/permissions-reference

Splunk Detection and Monitoring

In the context of Azure AD apps, I find the below searches useful which may be used for detections to be monitored by SOC:

Detect when high privileged permissions are assigned to Azure AD apps

Lets create a lookup of high privileged permissions with perm as the column

Splunk query to get all the instance when the permissions are assigned to the app matching the ones in the lookup table.

index=”o365″ Operation=”Add app role assignment to service principal.” ResultStatus=Success
| spath path=ModifiedProperties{}.NewValue output=NewValues
| spath path=Target{}.ID output=NewTargetValues
| eval _time = strptime(CreationTime, “%Y-%m-%dT%H:%M”)
| eval appname = mvindex(NewValues, 6)
| eval perm = mvindex(NewValues, 1)
| eval permdesc = mvindex(NewValues, 2)
| eval appid = mvindex(NewValues, 7)
| eval target = mvindex(NewTargetValues, 3)
| join type=inner perm [ inputlookup azure_m365_permissions.csv | table perm ]
| table _time, UserId, appid, appname, perm, permdesc, target

A new credential has been added to an Azure AD app

index=o365 Operation=”Update application – Certificates and secrets management ” ResultStatus=”Success”
| table _time UserId OrganizationId Operation Target{}.ID ModifiedProperties{}.NewValue ModifiedProperties{}.Name ModifiedProperties{}.OldValue Target{}.Type

Ahh-My-API : Discover publically exposed APIs in AWS

TL;DR;

The REST API gateways created in AWS have a default endpoint [https://{api_id}.execute-api.{region}.amazonaws.com] and If not explicitly secured, they are publically accessible from internet by default. Wrote a script which would find such APIs across all regions under all the AWS accounts in the AWS organizations and takes screenshot their webpage for evidence. It will also generate a CSV file which may be ingested by a SIEM such as Splunk for alerting and remediation.

https://github.com/ashishmgupta/ah-my-api

The script when executed will produce a CSV file in the below format showing all the API URLs and which one could be publically accessible and which security setting are applied on the API if API is not accessible.

It is important to discover and actually test the endpoints from an external environment to reduce the false positives for detection becuase APIs can be secured by various means (described below)

Most common ways to secure AWS Rest APIs

  • API Token e.g. Check for specific token value in the pre-defined x-api-header.
  • Lambda Authorizers e.g. Custom lamda code to check for specific headers/secrets before allowing access.
  • Resource policies e.g. Allow access from certain IP addresses and deny others.
  • Authentication/Authorization from with in the backend code (e.g. Lambda).

How to use the script


We follow below two steps :

  • Set up an IAM user with approperiate permissions in the management account to assume a given role in the other accounts.
  • Set up the role to assume in all the workload accounts using CloudFormation and StackSets.

The script makes use of Access Key on the IAM user “boto3user” in the management account.
boto3user has the permission to assume role in the workload account and get temporary credentials to access the API gateways in the workload accounts. Diagram below :

In my AWS organizations, I have 3 AWS accounts out of which “Account 1” is the management account.

Setting up the IAM user and permissions in the management account

Create a IAM user named boto3user.

Create an access key and secret for the IAM user.

Create a policy with below and assosciate it with the IAM user.

ScanAWSAPIPolicy

This allows the user to assume the role named ScanAWSAPIRole in all the AWS accounts in the AWS organization.
Since the script will iterate through the AWS organizations as well, we provide the ListAccounts and DescribeAccount permission as well.

{
    "Version": "2012-10-17",
    "Statement": [
        {
            "Sid": "VisualEditor0",
            "Effect": "Allow",
            "Action": [
                "organizations:ListAccounts",
                "organizations:DescribeAccount"
            ],
            "Resource": "*"
        },
        {
            "Sid": "VisualEditor1",
            "Effect": "Allow",
            "Action": "sts:AssumeRole",
            "Resource": "arn:aws:iam::*:role/ReadOnlyAPIGatewayAssumeRole"
        }
    ]
}

Create the role to assume in the other accounts

We will use a CloudFormation template for the role to be created and Stackset to deploy the template across all the AWS accounts in the AWS organization.

  1. Download the CloudFormation template from here and save it locally :
    https://github.com/ashishmgupta/ah-my-api/blob/main/CloudFormation_Template_For_Role_and_Policy.yaml
  2. On the management account, navigate to CloudFormation > StackSets > Create StackSet

3. In the “Specify template” section, choose “Upload a template file” and browse to select the previously saved CloudFormation template

4. Specify a name for the StackSet and optional description.

5. In the deployment options screen, set the deployment target as “Deploy to Organization”
and specify US East as the region.

6. In the review screen, acknowledge and submit.

StackSet has been deployed with success.

Verify the role has been created across all the accounts

We can see the role “ReadOnlyAPIgatewayAssumeRole” has been created in the AWS accounts.
The “Trusted entities” is the AWS Account number of the management account which is trusted to assume the “ReadOnlyAPIgatewayAssumeRole” role.

If we look at the role, we see the Policy named “ReadOnlyAPIGatewayPolicy” is attached to it with GET/HEAD operations on apigateway just like we specified in the CloudFormation template.

when we look at the “Trusted Entities”, we notice the IAM user named “boto3user” in the management account.
This means It is this user which has the permission to assume the “ReadOnlyAPIgatewayAssumeRole” role in all the AWS accounts and call the API gateway GET/HEAD operation.

Running the script

Setup the AWS credentials

aws configure

Clone the git repo

https://github.com/ashishmgupta/ah-my-api.git

Install all the requirements

pip install -r requirements

Run the script

python .\ah-my-api.py

Microsoft 365 Security Implementation

Below are the concrete steps we can take to secure Microsoft O365 tenants.

Microsoft O365 Security Implementation (ashishmgupta.github.io)

(This will be a living document and will be updated as new features are published)

This includes below :

Azure Policy – Deny creation of virtual machines without IP restriction across all Azure subscriptions

TLDR;

Public Azure virtual machines without any IP restriction is always an attack vector which may result in compromise of the VM and further lateral movement in Azure infrastructure.
Azure policy may be used to deny any attempt to even create the virtual machines without IP restriction.
This blog post has step-by-step process on how to implement an Azure policy on ALL your subscriptions covering IP restriction for ALL your future virtual machines.

What is Azure policy:

Azure policy is a service inside Azure that allows configuration management.It executes every time a new resource is added or an existing resource is changed. It has a set of rules, and set of actions. The Azure policy could report the event as non-compliant or even deny the action altogether if the rules are not matched.

Azure policy is an excellent way to enforce and bake-in security and compliance in the Azure infrastructure.
As you see in the below picture, Azure policy is an integral part of Azure Governance – mainly consisting of Policy Definitions and Policy Engine which works directly with Azure Resource Manager (ARM).

image 
Image source : https://www.microsoft.com/en-us/us-partner-blog/2019/07/24/azure-governance/

Summary:

If the Azure virtual machines need to be accessible over internet, Its important to restrict access its access ONLY from your corporate public IP addresses.
This will help in couple of situations :
a) Limit external access from an attacker.
b) Limit Insider threat or misuse from an employee.
The IP address restriction could be created while creating the virtual machine using network security groups.
However, enforcing this on the policy level by the administrator would ensure we are not dependent on individual team’s best judgment.

Process:

As a best practice, always test the policy in audit mode before switching to deny mode. In this walkthrough, we will follow below steps :

1) Create the policy definition.
2) Apply the policy (Policy Assignment) in audit mode
3) Test with Audit mode
3) Apply the policy (Policy Assignment) in deny mode
4) Test with Deny mode

Create the policy definition

On the search bar, search for “policy” and click on it.

image

Click Definitions and then click Policy Definitionimage

Click the … button under “Definition Location” to select the management group. If you want to apply this policy to all subscriptions, don’t select any subscription.
To apply this policy to a specific subscription, select the desired subscription under the subscription dropdown.

image

Policy Details:

Name:
Deny creation of virtual machine without access restricted only from company’s public IP addresses
(on-prem/VPN)

Description (Change the IP address list below):
Deny creation of virtual machine which does not have external company IP addresses restriction in the network security group.
One or more of the below corporate IP addresses must be specified in the network security group when creating the virtual machine. Otherwise, the validation will fail and the virtual machine will not be created.
Below is the valid public corporate IP addresses list :
208.114.51.253
104.104.51.253
108.104.51.253

Category : Network
image 
Policy Rule:

{
  "mode": "All",
  "policyRule": {
    "if": {
      "allOf": [
        {
          "field": "type",
          "equals": "Microsoft.Network/networkSecurityGroups"
        },
        {
          "count": {
            "field": "Microsoft.Network/networkSecurityGroups/securityRules[*]",
            "where": {
              "allOf": [
                {
                  "anyof": [
                    {
                      "field": "Microsoft.Network/networkSecurityGroups/securityRules[*].sourceAddressPrefix",
                      "notIn": [
                        "208.114.51.253",
                        "104.104.51.253",
                        "108.104.51.253"
                      ]
                    }
                  ]
                }
              ]
            }
          },
          "greater": 0
        }
      ]
    },
    "then": {
      "effect": "[parameters('effect')]"
    }
  },
  "parameters": {
    "effect": {
      "type": "String",
      "metadata": {
        "displayName": "Effect",
        "description": "The effect determines what happens when the policy rule is evaluated to match"
      },
      "allowedValues": [
        "audit",
        "deny"
      ],
      "defaultValue": "audit"
    }
  }
}

Policy Assignment

Under policy > definition, go to the newly created policy definition.
image

Click Assign.

image

Provide an assignment name and description
Name:
Deny creation of virtual machine without access restricted only from company’s public IP addresses
(on-prem/VPN)

Description (Change the IP address list below):
Deny creation of virtual machine which does not have external company IP addresses restriction in the network
security group.
One or more of the below corporate IP addresses must be specified in the network security group when creating the virtual machine. Otherwise, the validation will fail and the virtual machine will not be created.
Below is the valid public corporate IP addresses list :
208.114.51.253
104.104.51.253
108.104.51.253

image

Under “Parameters” tab, select “audit” in the Effect dropdown and click “Review+Create”

image

On the review page, click “Create” .

image

The policy assignment is created. Please note It takes about 30 minutes to take effect.

image


Test 1 – Audit mode :
Create virtual machine with RDP allowed from any external IP Address

With the policy in Audit mode, let us create a new virtual machine with RDP open to any external IP address.

image

image

image
When the policy is in the audit mode, the virtual machine creation is successful but Azure policy adds a Microsoft.Authorization/policies/audit/action operation to the activity log and marks the resource as non-compliant.

Activity Logsimage

Compliance State:
Policy > Compliance
image

Test 2 – Deny mode
Create virtual machine with RDP allowed from any external IP Address

We need to change the effect mode to “deny” in our policy assignment.
Head over to Policy > Assignments > Click on the policy we created

image
Click “Parameters” tab. Select “deny” from the dropdown and continue to save the policy assignment.

image

Attempt to create a virtual machine with the same settings as we did before.
image

When you proceed to create the virtual machine, the final validation will fail with an error message (left side) which when clicked will show which policy disallowed this action.

image

Clicking on the policy would show the policy assignment with details showing why the policy disallowed this action.

image

When the policy is in the deny mode, the virtual machine creation is successful but Azure policy adds a Microsoft.Authorization/policies/deny/action operation to the activity log and marks the resource as non-compliant.

Under activity logs, you can see the deny action.:
image

image

Summary :

Azure policy is an excellent way of enforcing compliance in Azure infrastructure. In this blog post we saw how we can apply Azure policy to deny creation of virtual machines without any IP restriction.
For further readings :
Azure policy docs : https://docs.microsoft.com/en-us/azure/governance/policy/overview
Azure policy Github : https://github.com/Azure/azure-policy

Azure Sentinel – Detecting brute force RDP attempts

Azure Sentinel is a cloud based SIEM* and SOAR** solution.
As it’s still in preview, I wanted to test out few of Its capabilities.
In this post we will see how we can detect RDP brute-force attempts and respond using automated playbooks in Azure Sentinel.
[*SIEM : Security Incident Event Management]
[**SOAR : Security Orchestration Automated Response]

image
https://docs.microsoft.com/en-us/azure/sentinel/overview

The infrastructure:

I have couple of virtual machines in Azure which have RDP opened (sure, I am the first one to keep that opened) 🙂 Below is one of the Win 2012 machine.

image

The Attack:

Attackers always the scan the whole CIDR to find the services running on the machines in the range. In this example, simulating the scan, I will use only one machine ( the above one) from the Kali VM looking if the RDP (port 3389) is opened.

nmap -p 3389 IPAddress –Pn

image

For brute-force, we will use crowbar.
Clone the repository:
git clone https://github.com/galkan/crowbar.git
image

I have separate files for usernames(userlist) and passwords(passwordlist) which will be used by Crowbar in combination to attempt to login to the above machine via RDP.

python crowbar.py -b rdp -s ipaddress -U userlist -C passwordlist –v
-b indicates target service. In this case Its rdp but crowbar also supports openvpn, sskkey and vnckey.
-v indicates verbose output

You see the combination which has “RDP-SUCCESS” is the right combination of user name and password which was brute-forced for successful login via RDP. Other attempts failed. Of course, I have the right user name and password in the file. 🙂
 
image

Azure Sentinel

Now lets get to Azure Sentinel. As noted above, Its a cloud based SIEM.
You can quickly locate “Azure Sentinel” from the search bar.
image

Sentinel manages all Its data in a log analytics workspace. If you already have one, you can reuse or create a new one.

image

One of the first thing you notice in Azure Sentinel is a number of in-built Data Connectors available to collect data from different sources. Not only that includes Azure native data sources such as Azure AD, Office 365, Security center to name a few but also third parties like Palo Alto, Cisco ASA, Checkpoint, Fortinet and F5.
Pretty sure the list will only get longer.

For the purpose of this blog post, we will focus on the “Security Events” by clicking on “Configure”.

image

Select “All events”.
Click on “Download install Agent for Windows Virtual machines”.
Select the Virtual machine where the agent will be installed.
Click “Connect”.
The “Connect” process takes few minutes to complete.

image

image

image

When the machine is shows “Connected” in Azure portal, you will see the Microsoft Monitoring Agent (MMA) service running on the machine which will upload the logs to the Azure sentinel workspace for the subscription.

image

Start writing some queries

Azure Sentinel uses Kusto Query Language for read-only requests to process data and return results.
In the sentinel workspace, click on “Logs” and use the below query which is basically looking for security events with successful login event (EventId 4624) and unsuccessful login event (EventId 4625) originating from a workstation named “kali”.
Note the highlighted event was the only successful attempt(EventId 4624) and rest were failures (4525).

SecurityEvent
| where (EventID == 4625 or EventID== 4624) and WorkstationName == “kali”
| project TimeGenerated, EventID , WorkstationName,Computer, Account , LogonTypeName , IpAddress
| order by TimeGenerated desc

image

image

Creating Alerts

Create an alert for the above use case by clicking “Analytics” > Add

image

Give a name to the alert, provide a description. and set the severity.

image

Set the alert query to detect any RDP login failure:

SecurityEvent
| where EventID == 4625
| project TimeGenerated, WorkstationName,Computer, Account , LogonTypeName , IpAddress
| order by TimeGenerated desc

image

Set the entity mapping. These properties will be populated from the projected fields in the query above.
Will be very useful information when we build playbooks. As you can see, there are only three properties which could be mapped at this point but more to come.

In this example, Account Name used for the attempted login, the host where It is being tried on and the workstation where It is tried from will be populated.

image

Playbook

Playbooks in Azure Sentinel are basically Logic apps which is really powerful not only because of the inbuilt templates but also because they can be heavily customized.

image

Sorry, I just wanted to remind myself again and you, dear reader that logic apps are really powerful. 🙂

image

Create the logic app:

image

In the designer, click on “Blank Logic App”

image

We first need to define the trigger. In this case It would be when the response to an alert is triggered in Azure Sentinel.
Search “Sentinel” in the textbox and you will find the trigger. Click on the trigger and the trigger will be added as a first step.

image

We will send an email to respective team (e.g. Security Operations) when this event happens. In this case I am sending the email to my Office 365 email address.

image

You will need an Office 365 tenant(sign up for free trial here) to send email.
In the below example, I already one and connected. If I didn’t, all I had to do is to sign-in with my admin office-365 account and connection would be available to send emails.

As you click through the subject and body, you will be prompted to select the Dynamic contents which will have relevant data in this case.

image

image

Cases

When an alert fires, I creates a case and you can execute the relevant playbook for the case.
In this example, we have a alert configured named “rdp-bruce-force attempt-alert”.
Every time that alert fires, I will create a new case with the same name as the alert with a case Id.
We can then execute the relevant playbook on the case. In this example, we will execute the playbook we created before “rdp-bruce-force attempt-alert-playbook”.

In the Sentinel workspace, click on “Cases” to review all the cases and click on the case which got created for the brute-force attempt.

image

At the bottom the details pane of the case, click on the “View full details”.image

Click “View Playbooks”

image

Click on “Run” for the playbook we want to execute.

image

Below is the email as a part of the playbook I got with the account names in the security event logs.

image

Hope this helps! 🙂