Azure AD/ Entra ID apps : Restrict email permissions to specific mailboxes

There are scenarios when a datacenter hosted app or a cloud hosted app needs access to one or more Exchange Online mailbox.
In such cases, typically an Azure AD app is created with permissions to read/write access to mailboxes/calendars and contacts.
Issue here is by default the access is provided for ALL the mailboxes. If an attacker gets holds of the app, the could potentially access emails from sensitive mailboxes and exfilter them.

The setup

The Azure AD app with mail.read/mail.send permissions.
The credential (secret) has been created for this app and used by a service app named “service1” .
The service1 app will read email from the mailbox service1.mailbox@redteamsimulation.com.

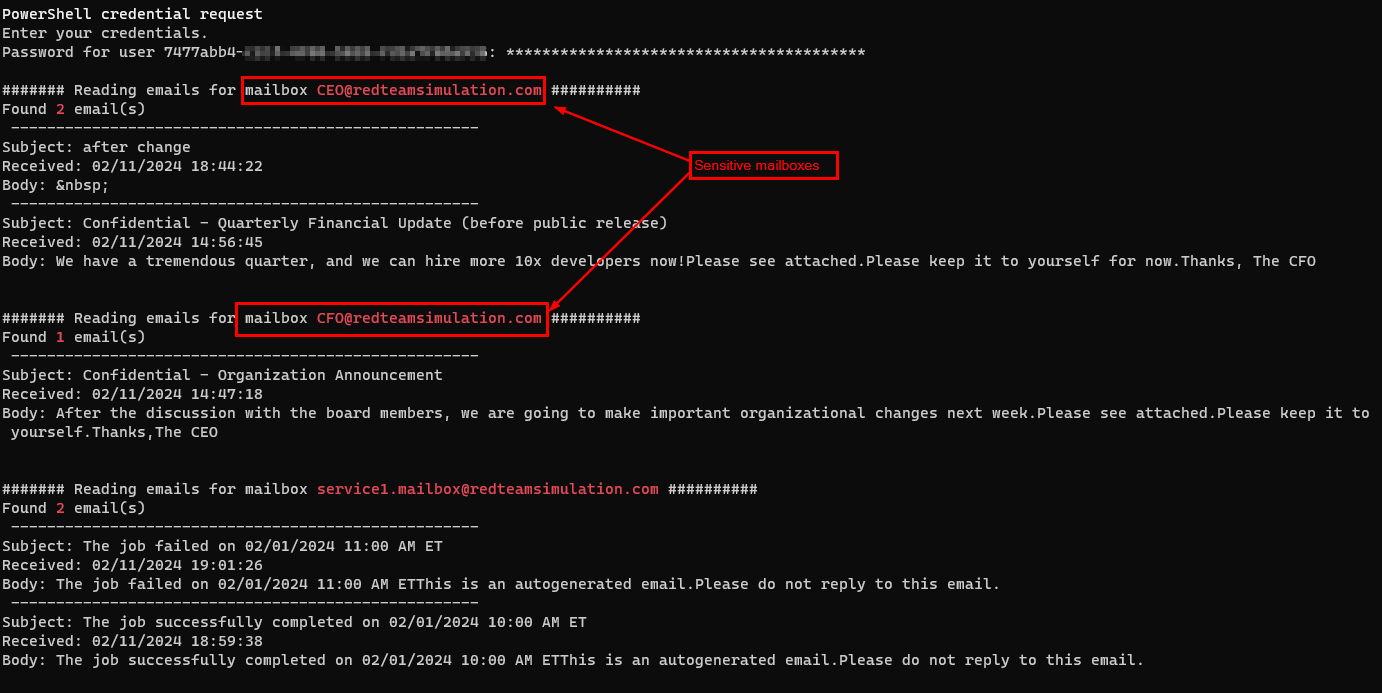
However, one can make use of the credentials for this Azure AD app to get emails from not only originally intended mailbox for the service but also sensitive mailboxes such as those of CEO and CFO as you can see in the below screenshot.

Code to get emails from all the mailboxes

Prerequisites : Install and import ExchangeOnlinemanagement module and Microsoft.Graph modules

Install-Module ExchangeOnlineManagement
Import-Module ExchangeOnlineManagement
Install-Module Microsoft.Graph
Import-Module Microsoft.Graph
# Import the required module
Import-Module Microsoft.Graph
$err_string= ''
# Set the necessary variables
$clientId = "7477abb4-xxxx-xxxx-xxxx-xxxxxx"
$tenantId = "c2b84b0b-xxxx-xxxx-xxxx-xxxxxxx"
$ClientSecretCredential = Get-Credential -Credential $clientId

# Connect to Microsoft Graph
Connect-MgGraph -TenantId $tenantId -ClientSecretCredential $ClientSecretCredential -NoWelcome

# Get all users in the tenant
$users = Get-MgUser

# Loop through each user
foreach ($user in $users) {
	# Get the user's mailbox
	try {
		$mailbox = Get-MgUserMailFolderMessage -UserId $user.Id -MailFolderId 'Inbox' -ErrorAction Stop
		$test = $user.Mail
		write-host "####### Reading emails for mailbox " -nonewline
		write-host $test -foreground red -nonewline
		write-host " ##########" 
		write-host "Found " -nonewline
		write-host $mailbox.Length -foreground red -nonewline
		write-host " email(s) " 
		foreach ($message in $mailbox) {
			# Print the message subject and received date
			Write-Output (" ----------------------------------------------------")
			Write-Output ("Subject: " + $message.Subject)
			Write-Output ("Received: " + $message.ReceivedDateTime)
			$body = $message.Body.Content -replace '<[^>]+>',''
			$body = $body.trim()
			Write-Output ("Body: " + $body)
		}
	write-host "`n"
	}
	catch
	{ 
		$err_string = $_ | Out-String
	}
	if ($err_string -inotmatch "The mailbox is either inactive, soft-deleted, or is hosted on-premise")
	{
		Write-Host $err_string
	}
}
# Disconnect from Microsoft Graph
Disconnect-MgGraph

Limiting access to only certain mailboxes

Below powershell will :
a) Create a mail-enabled security group with the mailbox we want to only allow to be accessed from the app.
b) Create an application access policy for the app with access restricted to only the mail enabled group created in step a)

$MailEnabledDistGroup=New-DistributionGroup -Name "Service1-RestrictedDistGroup" -Type "Security" -Members "service1.mailbox@redteamsimulation.com"
New-ApplicationAccessPolicy -AppId <AppId> -PolicyScopeGroupId $MailEnabledDistGroup.Id -AccessRight RestrictAccess -Description "Mailbox restrictions"

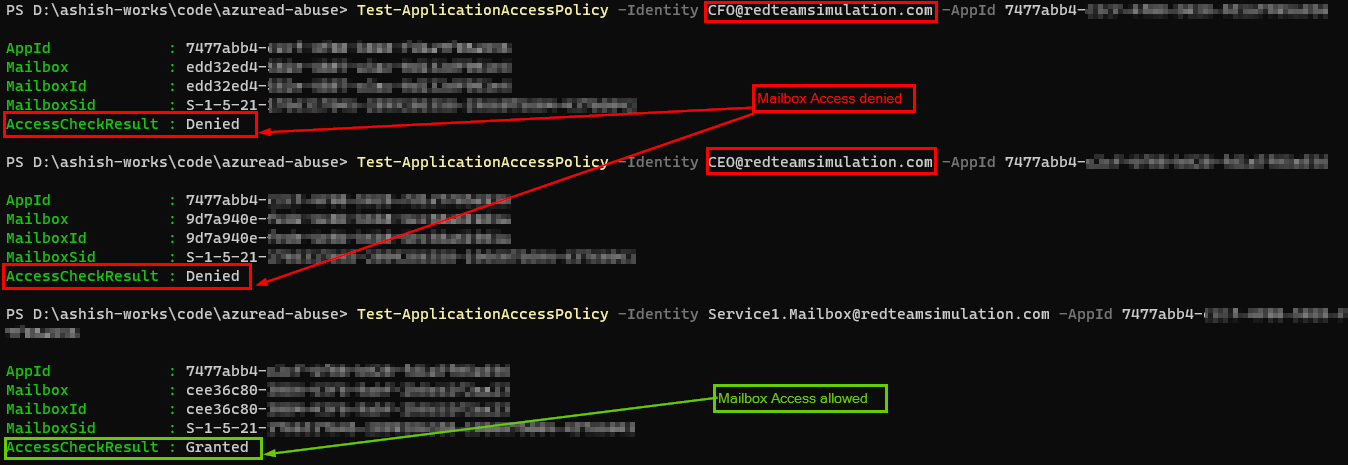
In my tests, the application access policy took effect in 60-90 minutes and after that accessing other mailboxes would give an error.
Below is the output running the same script as above.

Getting a handle on Azure AD/ Entra ID apps and their permissions

Midnight blizzard attack on Microsoft involved abuse of permissions on Azure AD/OAuth apps. Therefore, Its important to take stock of all the apps and their permissions and evaluate if we need those permissions and reduce them if we can.

Per the post, the attacker abused Office 365 Exchange Online full_access_as_app role, which allows access to mailbox. However, Microsoft Graph API also allows an app to use privileged mail.read/mail.write/mail.readwrite which can be abused to have similar effect.

This post has details on how to get all the apps and their permissions and potential way to prevent/detect.

What are Azure AD / Entra ID apps

On a high level, you can use Azure AD app to access any resources in Azure and M365 and that includes emails as well.

When you create an Azure AD application, you’re essentially registering your application with Azure AD, obtaining an application ID (also known as client ID) and optionally a client secret or certificate for authentication purposes and permissions to authorize them to access resources. This allows your application to authenticate users against Azure AD and access resources on behalf of those users.

Because attackers can abuse the high privileged permissions on Azure AD app to access Azure/M365 , It’s important to govern the apps and their permissions and below are few ways :

  • Get all the Azure AD apps and their permissions
  • Do we even need that “prod” Azure AD app?
  • Do we really need those permissions on the “prod” Azure AD app?
  • Apply conditional access policy on the apps e.g. IP restriction
  • Apply restrictions on domain users to register Azure AD/Entra apps
  • Understand roles and users in those roles which can manage Azure AD applications
  • Splunk monitoring and detection

Get all the Azure AD apps and their permissions

Powershell script to export all the azure AD apps and their permissions

Install the Azure AD module.
install-module azuread

# Connect to Azure AD
Connect-AzureAD

# Get all Azure AD applications
$allApps = Get-AzureADApplication -All $true
$array = @()
# Loop through each application
foreach ($app in $allApps) {
    Write-Host "Application Name: $($app.DisplayName)"

    # Get the required resource access (application permissions)
    $appPermissions = $app.RequiredResourceAccess | ForEach-Object {
        $resourceAppId = $_.ResourceAppId
        $resourceSP = Get-AzureADServicePrincipal -Filter "AppId eq '$resourceAppId'"
        $_.ResourceAccess | ForEach-Object {
            $permissionId = $_.Id
            $permissionType = $_.Type
            $permission = $null
			#$resourceSP
            if ($permissionType -eq 'Role') {
                $permission = $resourceSP.AppRoles | Where-Object { $_.Id -eq $permissionId }
            } elseif ($permissionType -eq 'Scope') {
                $permission = $resourceSP.Oauth2Permissions | Where-Object { $_.Id -eq $permissionId }
            }

            if ($permission) {
                [PSCustomObject]@{
                    'Application Name' = $app.DisplayName
					'API' = $resourceSP.DisplayName
                    'Permission Name' = $permission.Value
                    'Permission Description' = $permission.Description
                    'Permission Type' = $permissionType
                }
            }
        }
    }
	$array+=$appPermissions
    # Output the permissions
    #$appPermissions | Format-Table
}
$array | Export-Csv "output.csv"

The CSV file generating the below output :

  • Application Name
  • API
  • Permission Name
  • Permission Description
  • Permission Type (“Role” means application permissions and “Scope” means delegated permissions

Splunk output

If you are using Splunk and using ingesting the activity logs from M365 using Splunk Add-On for Microsoft 365, you can use below query to get all the app role assignments.

 index="o365" Operation="Add app role assignment to service principal."
| spath path=ModifiedProperties{}.NewValue output=NewValues
| spath path=Target{}.ID output=NewTargetValues
| eval _time = strptime(CreationTime, "%Y-%m-%dT%H:%M")
| eval AppName = mvindex(NewValues, 6)
| eval perm = mvindex(NewValues, 1)
| eval permdesc = mvindex(NewValues, 2)
| eval target = mvindex(NewTargetValues, 3)
| table _time, AppName, perm, target
| stats values(perm) as AllAPIPermissions, values(target) as API by AppName

Using MSIdentityTools

Mr. Merill Fernando [Principal Product Manager, Entra ] released a fantastic video for the update in the MSIdentityTool to generate the apps and permissions. Works like a charm.

Do we even need that “prod” Azure app?

Now that you have the list of the apps from the script above, you want to chedk if the apps in the list are even being used.
Login to Microsoft Entra Admin Center > Monitoring & Health > Service Principal sign-ins > Filter for last 7 days
If its a production app, and if they are not in the sign-in events screen for last 7 days, you want to ask the app owners if this app is needed any more. Get the email confirmation and remove the app.

Do we really need those permissions on the “prod” Azure AD app?

Sometimes, apps are assigned permissions which they really dont need. For example, mail.send/mail.read/mail.readwrite are assigned to an app to work with couple of mailboxes. However, the permissions are meant to work with ALL mailboxes and can be abused by an attacker.

Implement Conditional Access for Azure AD apps

Azure AD apps do not honor the conditional access policies to enforce IP restriction, for example. A potential solution is to use Microsoft Entra Workload ID premium feature.

Apply restrictions on domain users to register Azure AD/Entra apps

Login to Azure portal > Microsoft Entra ID > User settings.
Ensure the “User can register applications” is set to “No”.

This takes out the risk of a domain user registering an app and giving it permissions – although an admin still needs to grant consent on it.
Having said that, even with the above setting in place there are roles which can register applications. An example below is role “Application developers”.

This is another reason why best security practices should need to be applied for the privileged roles.

https://learn.microsoft.com/en-us/entra/identity/role-based-access-control/privileged-roles-permissions?tabs=admin-center

Understand roles and users in those roles which can manage Azure AD applications

Apart from the “Application developer” role which can register Azure AD apps, below two are privileged roles which can add/update credentials to an existing Azure AD apps as well. So, if the attacker compromises users in the below roles, they can quickly escalate privileges by adding credentials to an existing Azure AD app which has high privileges like  full_access_as_app role or mail.read/send and exfilter emails out of mailboxes.

Therefore, we should be careful assigning these roles and if absolutely needed ensure they arew cloud-only accounts with MFA turned on.

  • Application Administrator
  • Cloud Application Administrator

https://learn.microsoft.com/en-us/entra/identity/role-based-access-control/permissions-reference

Splunk Detection and Monitoring

In the context of Azure AD apps, I find the below searches useful which may be used for detections to be monitored by SOC:

Detect when high privileged permissions are assigned to Azure AD apps

Lets create a lookup of high privileged permissions with perm as the column

Splunk query to get all the instance when the permissions are assigned to the app matching the ones in the lookup table.

index=”o365″ Operation=”Add app role assignment to service principal.” ResultStatus=Success
| spath path=ModifiedProperties{}.NewValue output=NewValues
| spath path=Target{}.ID output=NewTargetValues
| eval _time = strptime(CreationTime, “%Y-%m-%dT%H:%M”)
| eval appname = mvindex(NewValues, 6)
| eval perm = mvindex(NewValues, 1)
| eval permdesc = mvindex(NewValues, 2)
| eval appid = mvindex(NewValues, 7)
| eval target = mvindex(NewTargetValues, 3)
| join type=inner perm [ inputlookup azure_m365_permissions.csv | table perm ]
| table _time, UserId, appid, appname, perm, permdesc, target

A new credential has been added to an Azure AD app

index=o365 Operation=”Update application – Certificates and secrets management ” ResultStatus=”Success”
| table _time UserId OrganizationId Operation Target{}.ID ModifiedProperties{}.NewValue ModifiedProperties{}.Name ModifiedProperties{}.OldValue Target{}.Type

Azure Policy – Deny creation of virtual machines without IP restriction across all Azure subscriptions

TLDR;

Public Azure virtual machines without any IP restriction is always an attack vector which may result in compromise of the VM and further lateral movement in Azure infrastructure.
Azure policy may be used to deny any attempt to even create the virtual machines without IP restriction.
This blog post has step-by-step process on how to implement an Azure policy on ALL your subscriptions covering IP restriction for ALL your future virtual machines.

What is Azure policy:

Azure policy is a service inside Azure that allows configuration management.It executes every time a new resource is added or an existing resource is changed. It has a set of rules, and set of actions. The Azure policy could report the event as non-compliant or even deny the action altogether if the rules are not matched.

Azure policy is an excellent way to enforce and bake-in security and compliance in the Azure infrastructure.
As you see in the below picture, Azure policy is an integral part of Azure Governance – mainly consisting of Policy Definitions and Policy Engine which works directly with Azure Resource Manager (ARM).

image 
Image source : https://www.microsoft.com/en-us/us-partner-blog/2019/07/24/azure-governance/

Summary:

If the Azure virtual machines need to be accessible over internet, Its important to restrict access its access ONLY from your corporate public IP addresses.
This will help in couple of situations :
a) Limit external access from an attacker.
b) Limit Insider threat or misuse from an employee.
The IP address restriction could be created while creating the virtual machine using network security groups.
However, enforcing this on the policy level by the administrator would ensure we are not dependent on individual team’s best judgment.

Process:

As a best practice, always test the policy in audit mode before switching to deny mode. In this walkthrough, we will follow below steps :

1) Create the policy definition.
2) Apply the policy (Policy Assignment) in audit mode
3) Test with Audit mode
3) Apply the policy (Policy Assignment) in deny mode
4) Test with Deny mode

Create the policy definition

On the search bar, search for “policy” and click on it.

image

Click Definitions and then click Policy Definitionimage

Click the … button under “Definition Location” to select the management group. If you want to apply this policy to all subscriptions, don’t select any subscription.
To apply this policy to a specific subscription, select the desired subscription under the subscription dropdown.

image

Policy Details:

Name:
Deny creation of virtual machine without access restricted only from company’s public IP addresses
(on-prem/VPN)

Description (Change the IP address list below):
Deny creation of virtual machine which does not have external company IP addresses restriction in the network security group.
One or more of the below corporate IP addresses must be specified in the network security group when creating the virtual machine. Otherwise, the validation will fail and the virtual machine will not be created.
Below is the valid public corporate IP addresses list :
208.114.51.253
104.104.51.253
108.104.51.253

Category : Network
image 
Policy Rule:

{
  "mode": "All",
  "policyRule": {
    "if": {
      "allOf": [
        {
          "field": "type",
          "equals": "Microsoft.Network/networkSecurityGroups"
        },
        {
          "count": {
            "field": "Microsoft.Network/networkSecurityGroups/securityRules[*]",
            "where": {
              "allOf": [
                {
                  "anyof": [
                    {
                      "field": "Microsoft.Network/networkSecurityGroups/securityRules[*].sourceAddressPrefix",
                      "notIn": [
                        "208.114.51.253",
                        "104.104.51.253",
                        "108.104.51.253"
                      ]
                    }
                  ]
                }
              ]
            }
          },
          "greater": 0
        }
      ]
    },
    "then": {
      "effect": "[parameters('effect')]"
    }
  },
  "parameters": {
    "effect": {
      "type": "String",
      "metadata": {
        "displayName": "Effect",
        "description": "The effect determines what happens when the policy rule is evaluated to match"
      },
      "allowedValues": [
        "audit",
        "deny"
      ],
      "defaultValue": "audit"
    }
  }
}

Policy Assignment

Under policy > definition, go to the newly created policy definition.
image

Click Assign.

image

Provide an assignment name and description
Name:
Deny creation of virtual machine without access restricted only from company’s public IP addresses
(on-prem/VPN)

Description (Change the IP address list below):
Deny creation of virtual machine which does not have external company IP addresses restriction in the network
security group.
One or more of the below corporate IP addresses must be specified in the network security group when creating the virtual machine. Otherwise, the validation will fail and the virtual machine will not be created.
Below is the valid public corporate IP addresses list :
208.114.51.253
104.104.51.253
108.104.51.253

image

Under “Parameters” tab, select “audit” in the Effect dropdown and click “Review+Create”

image

On the review page, click “Create” .

image

The policy assignment is created. Please note It takes about 30 minutes to take effect.

image


Test 1 – Audit mode :
Create virtual machine with RDP allowed from any external IP Address

With the policy in Audit mode, let us create a new virtual machine with RDP open to any external IP address.

image

image

image
When the policy is in the audit mode, the virtual machine creation is successful but Azure policy adds a Microsoft.Authorization/policies/audit/action operation to the activity log and marks the resource as non-compliant.

Activity Logsimage

Compliance State:
Policy > Compliance
image

Test 2 – Deny mode
Create virtual machine with RDP allowed from any external IP Address

We need to change the effect mode to “deny” in our policy assignment.
Head over to Policy > Assignments > Click on the policy we created

image
Click “Parameters” tab. Select “deny” from the dropdown and continue to save the policy assignment.

image

Attempt to create a virtual machine with the same settings as we did before.
image

When you proceed to create the virtual machine, the final validation will fail with an error message (left side) which when clicked will show which policy disallowed this action.

image

Clicking on the policy would show the policy assignment with details showing why the policy disallowed this action.

image

When the policy is in the deny mode, the virtual machine creation is successful but Azure policy adds a Microsoft.Authorization/policies/deny/action operation to the activity log and marks the resource as non-compliant.

Under activity logs, you can see the deny action.:
image

image

Summary :

Azure policy is an excellent way of enforcing compliance in Azure infrastructure. In this blog post we saw how we can apply Azure policy to deny creation of virtual machines without any IP restriction.
For further readings :
Azure policy docs : https://docs.microsoft.com/en-us/azure/governance/policy/overview
Azure policy Github : https://github.com/Azure/azure-policy

Detection of identity-based risks using Azure AD Identity Protection and Graph API

Github repository : https://github.com/ashishmgupta/AzureADIdentityProtection

image

What is Azure AD Identity Protection?
Identity Protection is a tool in Azure AD that allows organizations to accomplish three key tasks:

  • Automate the detection and remediation of identity-based risks.
  • Investigate risks using data in the portal.
  • Export risk detection data to third-party utilities for further analysis.

Identity Protection identifies risks in the following classifications:

Risk Detection Type Description
Atypical travel Sign in from an atypical location based on the user’s recent sign-ins.
Anonymous IP address Sign in from an anonymous IP address (for example: Tor browser, anonymizer VPNs).
Unfamiliar sign-in properties Sign in with properties we‘ve not seen recently for the given user.
Malware linked IP address Sign in from a malware linked IP address
Leaked Credentials This risk detection indicates that the user’s valid credentials have been leaked
Azure AD threat intelligence Microsoft’s internal and external threat intelligence sources have identified a known attack pattern

Source :https://docs.microsoft.com/en-us/azure/active-directory/identity-protection/overview-identity-protection

Note : Azure AD Identity Protection is fully available in the Azure AD Premium P2 only.

In this blog post, we will focus on detection of the above identity based risks.

There are two steps :
1) From Azure Portal, setup the Application (with a token) with configured permissions to read data from Identity Protection.
2) Python script to use Graph API with the above OAuth token to access the Identity protection data to ingest in your SIEM tool.

Setting up the application in the Azure portal
Azure Active Directory > App Registrations > New Registration

image

Give the application a name.

image

Add API permissions.
API Permission > Add a permission

image

Click Microsoft Graph

image

Since we want the logs from an application instead for a user, select Application permission.

image

Now, there are three API and we need specific permissions for them to access data via Graph API.

API Name Details Permission Needed
Sign Ins Allows query Graph API for information on Azure AD sign-ins with specific properties related to risk state, details and level AuditLog.ReadAll
Directory.ReadAll
Risky Users Gets users identified by identity protection as risky users. IdentityRiskyUser.ReadAll
Risk Detections Gets both risky users and sign-in linked risk detections and associated information identityRiskEvents.ReadAll

Above API permissions need to be set under Microsoft Graph as shown below.

image image
image image

The Global Administrator of your tenant needs to grant admin consent for the permissions you added.
You should contact them for this and get the consent granted.

image

Create a new client secret.

Certificate and Secrets > New Client Secret

image

image

A secret is automatically generated and can be copied.

image

Python script to use Graph API to pull Identity Protection data
Below is the screenshot of of a section of the python code which uses the ClientId, Client Secret and the tenant domain to get the OAuth token and then uses the OAuth token to query the Microsoft Graph API to get the identity protection data in the JSON format for both risky users and risky detection.

Full source code is located here :
https://github.com/ashishmgupta/AzureADIdentityProtection

The code also retries in case of the number of requests crosses the threshold (HTTP 429 Too many requests).

image

Hope this post helps you implementing and querying the Azure Identity Protection data in your organization.
Please feel free to ask questions in the comments sections below.

Azure Sentinel – Detecting brute force RDP attempts

Azure Sentinel is a cloud based SIEM* and SOAR** solution.
As it’s still in preview, I wanted to test out few of Its capabilities.
In this post we will see how we can detect RDP brute-force attempts and respond using automated playbooks in Azure Sentinel.
[*SIEM : Security Incident Event Management]
[**SOAR : Security Orchestration Automated Response]

image
https://docs.microsoft.com/en-us/azure/sentinel/overview

The infrastructure:

I have couple of virtual machines in Azure which have RDP opened (sure, I am the first one to keep that opened) 🙂 Below is one of the Win 2012 machine.

image

The Attack:

Attackers always the scan the whole CIDR to find the services running on the machines in the range. In this example, simulating the scan, I will use only one machine ( the above one) from the Kali VM looking if the RDP (port 3389) is opened.

nmap -p 3389 IPAddress –Pn

image

For brute-force, we will use crowbar.
Clone the repository:
git clone https://github.com/galkan/crowbar.git
image

I have separate files for usernames(userlist) and passwords(passwordlist) which will be used by Crowbar in combination to attempt to login to the above machine via RDP.

python crowbar.py -b rdp -s ipaddress -U userlist -C passwordlist –v
-b indicates target service. In this case Its rdp but crowbar also supports openvpn, sskkey and vnckey.
-v indicates verbose output

You see the combination which has “RDP-SUCCESS” is the right combination of user name and password which was brute-forced for successful login via RDP. Other attempts failed. Of course, I have the right user name and password in the file. 🙂
 
image

Azure Sentinel

Now lets get to Azure Sentinel. As noted above, Its a cloud based SIEM.
You can quickly locate “Azure Sentinel” from the search bar.
image

Sentinel manages all Its data in a log analytics workspace. If you already have one, you can reuse or create a new one.

image

One of the first thing you notice in Azure Sentinel is a number of in-built Data Connectors available to collect data from different sources. Not only that includes Azure native data sources such as Azure AD, Office 365, Security center to name a few but also third parties like Palo Alto, Cisco ASA, Checkpoint, Fortinet and F5.
Pretty sure the list will only get longer.

For the purpose of this blog post, we will focus on the “Security Events” by clicking on “Configure”.

image

Select “All events”.
Click on “Download install Agent for Windows Virtual machines”.
Select the Virtual machine where the agent will be installed.
Click “Connect”.
The “Connect” process takes few minutes to complete.

image

image

image

When the machine is shows “Connected” in Azure portal, you will see the Microsoft Monitoring Agent (MMA) service running on the machine which will upload the logs to the Azure sentinel workspace for the subscription.

image

Start writing some queries

Azure Sentinel uses Kusto Query Language for read-only requests to process data and return results.
In the sentinel workspace, click on “Logs” and use the below query which is basically looking for security events with successful login event (EventId 4624) and unsuccessful login event (EventId 4625) originating from a workstation named “kali”.
Note the highlighted event was the only successful attempt(EventId 4624) and rest were failures (4525).

SecurityEvent
| where (EventID == 4625 or EventID== 4624) and WorkstationName == “kali”
| project TimeGenerated, EventID , WorkstationName,Computer, Account , LogonTypeName , IpAddress
| order by TimeGenerated desc

image

image

Creating Alerts

Create an alert for the above use case by clicking “Analytics” > Add

image

Give a name to the alert, provide a description. and set the severity.

image

Set the alert query to detect any RDP login failure:

SecurityEvent
| where EventID == 4625
| project TimeGenerated, WorkstationName,Computer, Account , LogonTypeName , IpAddress
| order by TimeGenerated desc

image

Set the entity mapping. These properties will be populated from the projected fields in the query above.
Will be very useful information when we build playbooks. As you can see, there are only three properties which could be mapped at this point but more to come.

In this example, Account Name used for the attempted login, the host where It is being tried on and the workstation where It is tried from will be populated.

image

Playbook

Playbooks in Azure Sentinel are basically Logic apps which is really powerful not only because of the inbuilt templates but also because they can be heavily customized.

image

Sorry, I just wanted to remind myself again and you, dear reader that logic apps are really powerful. 🙂

image

Create the logic app:

image

In the designer, click on “Blank Logic App”

image

We first need to define the trigger. In this case It would be when the response to an alert is triggered in Azure Sentinel.
Search “Sentinel” in the textbox and you will find the trigger. Click on the trigger and the trigger will be added as a first step.

image

We will send an email to respective team (e.g. Security Operations) when this event happens. In this case I am sending the email to my Office 365 email address.

image

You will need an Office 365 tenant(sign up for free trial here) to send email.
In the below example, I already one and connected. If I didn’t, all I had to do is to sign-in with my admin office-365 account and connection would be available to send emails.

As you click through the subject and body, you will be prompted to select the Dynamic contents which will have relevant data in this case.

image

image

Cases

When an alert fires, I creates a case and you can execute the relevant playbook for the case.
In this example, we have a alert configured named “rdp-bruce-force attempt-alert”.
Every time that alert fires, I will create a new case with the same name as the alert with a case Id.
We can then execute the relevant playbook on the case. In this example, we will execute the playbook we created before “rdp-bruce-force attempt-alert-playbook”.

In the Sentinel workspace, click on “Cases” to review all the cases and click on the case which got created for the brute-force attempt.

image

At the bottom the details pane of the case, click on the “View full details”.image

Click “View Playbooks”

image

Click on “Run” for the playbook we want to execute.

image

Below is the email as a part of the playbook I got with the account names in the security event logs.

image

Hope this helps! 🙂