PingFederate : Include a complex payload in the SAML assertion

Scenario :
You need to send a complex JSON payload in the SAML. The payload would depend upon the contextual data requested through a querystring . Below is the SP connection would look like:-

https://sso.idp.com/idp/startSSO.ping?PartnerSpId=https://www.serviceprovider.com&Request_Payload={“Param1″:”9999″,”Param2″:”8787879″,”Param3″:”Test”}

The input context is  in the querystring which is a JSON:-
{“Param1″:”9999″,”Param2″:”8787879″,”Param3″:”Test”}

Above request JSON when passed to a service will give a JSON response like below :-

"data": {
"level1": "some data",
"level2": "some data11",
"level3": {
    "level131": "some data 13",
    "level132": [{
        "level1321": {
            "level13211": {
                "level132111": "False",
                "level132112": "True"
            },
            "level13212": "some data",
            "level13213": "some data"
        },
        "level1322": "some data"
    },
    ],
    "level133": "test data",
    "level134": "test data",
    }
}

The output needs to be included in the SAML as a value for a SAML attribute. In this case the attribute is named as “Payload”. When we have implemented the solution, below is the part of the SAML response what It would like showing the attribute key “Payload” and the value from the service.

<saml:AttributeStatement>
      <saml:Attribute Name="Payload" NameFormat="urn:oasis:names:tc:SAML:2.0:attrname-format:unspecified">
        <saml:AttributeValue xsi:type="xs:string" xmlns:xs="http://www.w3.org/2001/XMLSchema" xmlns:xsi="http://www.w3.org/2001/XMLSchema-instance">
			"data": {
			"level1": "some data",
			"level2": "some data11",
			"level3": {
		    "level131": "some data 13",
		    "level132": [{
        	"level1321": {
            	"level13211": {
                "level132111": "False",
                "level132112": "True"
            },
            "level13212": "some data",
            "level13213": "some data"
        	},
        	"level1322": "some data"
    		},
    		],
    		"level133": "test data",
 	  	 	"level134": "test data",
    		}
			}
		</saml:AttributeValue>
      </saml:Attribute>
</saml:AttributeStatement>

Now on a first thought one would think this could be done using a custom data-source in PingFederate. However, a custom data-source does not have access to the HTTP request context and therefore cannot access the querystring.
One way to solve this to use an OGNL expression for the “Payload” attribute. The OGNL expression has access to the HttpRequest. So – not only we can get the querystring, but also can get the authentication cookies from the request which may be required by the payload service.

#ServiceURL="http://example.com/payloadservice", 
//Get all the cookies
#cookies=#this.get("context.HttpRequest").getObjectValue().getCookies(), 
#cookiesMap=new java.util.HashMap(), 
#cookies.{ #cookie=#this, #cookiesMap.put(#cookie.getName(),#cookie.getValue()) },  

// Get the querystring
#querystring = #this.get("context.HttpRequest").getObjectValue().getQueryString(), 
#indexOfPayLoadKey = #querystring.indexOf("&Request_Payload="), 
#actualPayload=#querystring.substring(#indexOfPayLoadKey), 

// Get the actual payload request
#actualPayload=#actualPayload.replace("&Request_Payload=",""), 

/* Via a service call, call the service with the payload request 
and get the payload response*/
#restPayloadServiceHelper = new com.pingfederate.utils.payloadservices.RESTPayloadServiceHelper(#ServiceURL), 
restPayloadServiceHelper.GetServiceResponsePayload(#actualPayload, #cookiesMap)


image

Below is the skeleton of the helper class the OGNL expression is using. The jar file for the class needs to be put in the “\pingfederate\server\default\deploy” folder and the PingFederate service needs to be restarted.

/*
The constructor takes the URL.
The method GetServiceResponse takes the payload and also the cookie collection
 */

public class RESTPayloadServiceHelper {
    
    String serviceURL = "";
    JSONObject jsonPayloadRequest = null;
    public RESTPayloadServiceHelper(String serviceURL)
    {
        if(serviceURL!= null || serviceURL.length() > 0)
        {
            this.serviceURL = serviceURL;
        }
        else
        {
            throw new IllegalArgumentException(" The supplied service URL " + serviceURL + " is not valid");
        }
    }
    
    public String GetServiceResponsePayload(String adhocPayloadString, HashMap<String,String> cookieCollection) throws UnknownHostException, IOException
    {
        // Call the service and return the payload response
    }

}

Developing and configuring a custom password credential validator [PCV] for PingFederate

This post provides a step-by-step instructions on developing and configuring  a custom password credential validator [PCV] for PingFederate using PingFederate SDK.
If you are using PingFederate in your enterprise, you would probably use an authentication service from PingFederate to authenticate your users. This sample example of custom PCV, demonstrates how to create the UI element in your PingFederate to configure your custom service URL and how the can you use the same service URL to authenticate the users.

I am using NetBeans IDE 8.0.2. However, you can use this same concept from Eclipse as well.

The source code for this project is available in the below GitHub repository.
https://github.com/ashishmgupta/pingfederate-idp-pcv-authenticate

Open Netbeans.
Go to File > New > Java Class Library
Click Next

image

Type a name for the project. I chose “pingfederate-idp-pcv-authenticate”

image

The created file view [Window > Files ] for the project will look like below

image

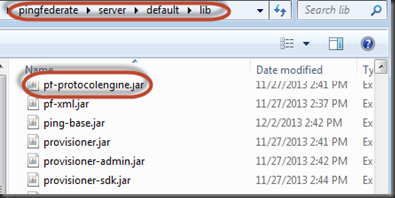
In order to use and compile the project with the PingFederate SDK, locate the pf-protocolengine.jar in the local pingefederate installation folder [\pingfederate\server\default\lib].

image

copy the  to the lib folder in the projects file view which will now look like below.

image

Go to the Project view of the project [Window > Projects]

 
image  

image

The reference to the pf-protocolengine.jar is now added.

image

Go to the File view and right click on the scr folder > Java Class >

image

Enter the class name as “pingfederate.passwordcredentialvalidators.Authenticator” and click Finished.

image

This created the below file

image

Extend the class from the PasswordCredentialsValidator. You do need to import few namespaces. Below is the complete class.

package pingfederate.passwordcredentialvalidators;

import com.pingidentity.sdk.GuiConfigDescriptor;

import com.pingidentity.sdk.PluginDescriptor;

import com.pingidentity.sdk.password.PasswordCredentialValidator;

import com.pingidentity.sdk.password.PasswordCredentialValidatorAuthnException;

import com.pingidentity.sdk.password.PasswordValidationException;

import java.util.Collections;

import org.sourceid.saml20.adapter.attribute.AttributeValue;

import org.sourceid.saml20.adapter.conf.Configuration;

import org.sourceid.saml20.adapter.gui.TextFieldDescriptor;

import org.sourceid.util.log.AttributeMap;

/**
 *
 * @author Ashish Gupta
 */
public class Authenticator implements PasswordCredentialValidator{
    
    private static final String authServiceURLLabel 
            = "Authentication service URL";
    private static final String authServiceURLDescription 
            = "The URL of the service which validates user's credentials";
    private static final String USERNAME = "username";
    private String authenticationURL = "";

    /*Creates a textfield for the authentication service URL in the Admin UI */
    @Override
    public PluginDescriptor getPluginDescriptor() {
       GuiConfigDescriptor guiDescriptor = new GuiConfigDescriptor();
       TextFieldDescriptor authServiceURLTextField = new TextFieldDescriptor
        (authServiceURLLabel, authServiceURLDescription);
       guiDescriptor.addField(authServiceURLTextField);
       PluginDescriptor pluginDescriptor = new PluginDescriptor
        (buildName(), this, guiDescriptor);
       /* Below will make the attributes available in the input Userid mapping 
       in the composite adapter If this is used inside the composite adapter.*/
       pluginDescriptor.setAttributeContractSet(Collections.singleton(USERNAME));
       return pluginDescriptor;
    }
   
    /* Get all the configured values in the PingFed admin e.g. Service URL */
    @Override
    public void configure(Configuration configuration) {
       this.authenticationURL = configuration.getFieldValue(authServiceURLLabel);
    }
    
    @Override
    public AttributeMap processPasswordCredential
        (String userName, String password) throws PasswordValidationException 
    {
       AttributeMap attributeMap = new AttributeMap();
       if(!AuthHelper.IsUserAuthenticated(this.authenticationURL, userName, password))
       {
           throw new PasswordCredentialValidatorAuthnException
        (false, "authn.srvr.msg.invalid.credentials");
       }
       else
       {
          /* The username value put here will be avilable to the next adapter 
           in the composite adapter chain*/
          attributeMap.put(USERNAME, new AttributeValue(userName));
       }
       return attributeMap;
    }
      
    private String buildName() {
        
        return "Custom password credential validator";
        /*
        Package plugin = Authenticator.class.getPackage();
        return plugin.getImplementationTitle();//+ " " + plugin.getImplementationVersion();         
        */
    }
}

Focus on the below methods in the /Authenticator.java:-

  1. getPluginDescriptor()
    This can be used to configure any set of UI elements which needs to be configured by the PingFed administrator. In this example, It creates a textfield for the authentication service URL in the Admin UI. This is where the PingFederate administrator would configure the service URL.

  2. configure(Configuration configuration)
    This can be used to get the configured values from the UI elements (set thie getPluginDescriptor) to the class level variables which then can be used in the processPasswordCredential() method [described below].

  3. processPasswordCredential(String userName, String password)
    Takes the username and password from the input fields in the HTML form and authenticates the user with your service. Ignore the implementation details of the service. If the authentication service does not allow the service, this method should throw the PasswordCredentialValidatorAuthnException with “false” and a string which shows up to the user in the HTML login form as an error message.

One more thing – You do have to identify this project as a password credential validator.
For this – add a folder named PF-INF under src and name it “password-credential-validators”.
Put the fully qualified name of the class, in this case – pingfederate.passwordcredentialvalidators.Authenticator.

image

Build the project and by default the jar file would be created under /dist folder. However, you can change the default location by changing the “dist.dir” property in the nbproject/project.properties file.

image

Now we have developed and deployed the custom PCV, Its time to configure the same in the
PingFederate admin console.

Configuring the custom PCV in PingFederate Admin console

Go to Server Configuration > Authentication > Password Credential Validators

image

Click “Create New Instance”

image

You can see the Type of the PCV in the type dropdown. Note that the text shown as the type here
is controlled by the name you provide in the below class instantiation in the getPluginDescriptor method as described above.

PluginDescriptor pluginDescriptor = new PluginDescriptor (“Custom Password Credential Validator”, this, guiDescriptor);

Provide a name and instance id as well and click Next.

image

Provide the service URL and click Next.

image

Notice the core contract attribute is username.
This is the attribute we set in the processPasswordCredential(). If the user is authenticated, we put the user name in this same attribute so that It is available for the next adapter in the composite adapter chain If this PCV is used in a composite adapter.

attributeMap.put(username, new AttributeValue(userName));

Click Next and Done and then

image

Below screen shows the summary. Click Done in this screen.

image

Click Save in the below screen.

image

You have successfully developed, deployed and configured a password credential validator in PingFederate.
In the forthcoming articles we will see how we can use this PCV in a adapter and set up the adapter for user authentication via HTML form.