There are scenarios when a datacenter hosted app or a cloud hosted app needs access to one or more Exchange Online mailbox. In such cases, typically an Azure AD app is created with permissions to read/write access to mailboxes/calendars and contacts. Issue here is by default the access is provided for ALL the mailboxes. If an attacker gets holds of the app, the could potentially access emails from sensitive mailboxes and exfilter them.
The setup
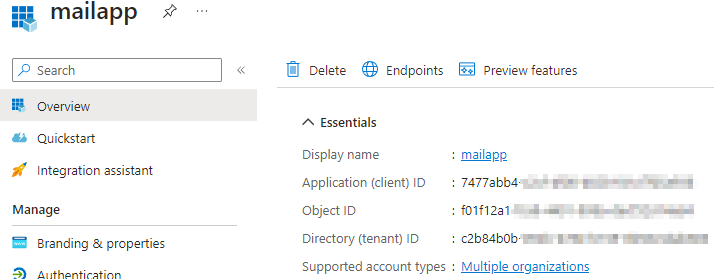
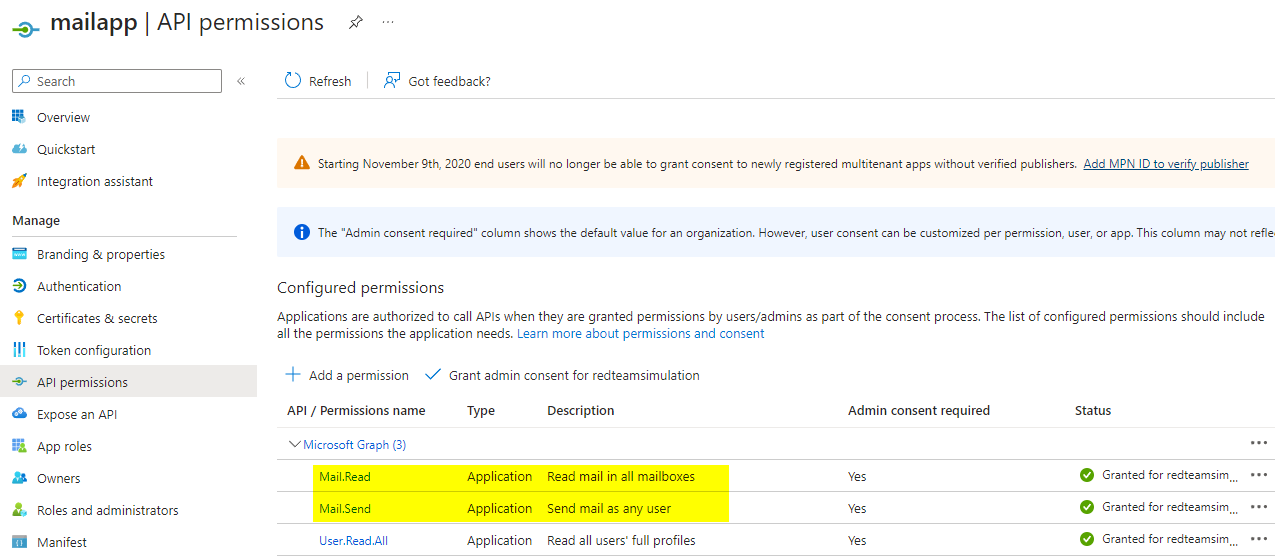
The Azure AD app with mail.read/mail.send permissions. The credential (secret) has been created for this app and used by a service app named “service1” . The service1 app will read email from the mailbox service1.mailbox@redteamsimulation.com.
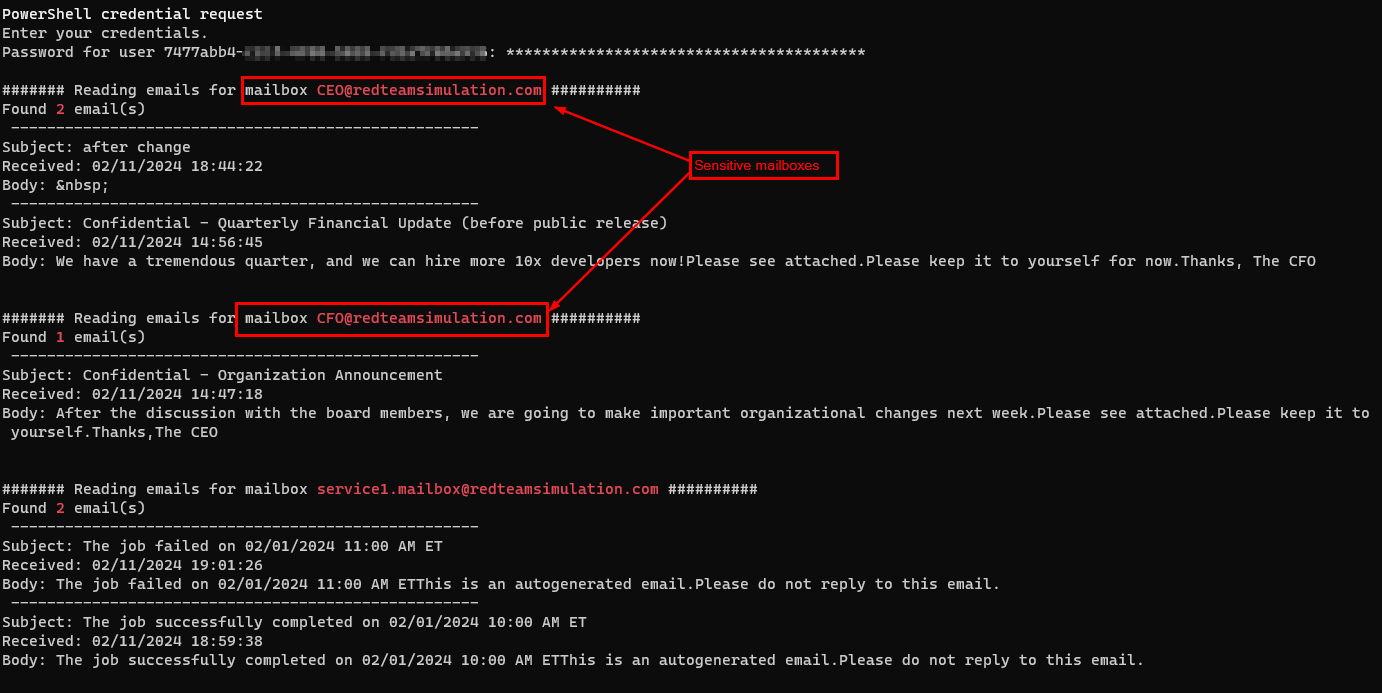
However, one can make use of the credentials for this Azure AD app to get emails from not only originally intended mailbox for the service but also sensitive mailboxes such as those of CEO and CFO as you can see in the below screenshot.
Code to get emails from all the mailboxes
Prerequisites : Install and import ExchangeOnlinemanagement module and Microsoft.Graph modules
# Import the required module
Import-Module Microsoft.Graph
$err_string= ''
# Set the necessary variables
$clientId = "7477abb4-xxxx-xxxx-xxxx-xxxxxx"
$tenantId = "c2b84b0b-xxxx-xxxx-xxxx-xxxxxxx"
$ClientSecretCredential = Get-Credential -Credential $clientId

# Connect to Microsoft Graph
Connect-MgGraph -TenantId $tenantId -ClientSecretCredential $ClientSecretCredential -NoWelcome

# Get all users in the tenant
$users = Get-MgUser

# Loop through each user
foreach ($user in $users) {
	# Get the user's mailbox
	try {
		$mailbox = Get-MgUserMailFolderMessage -UserId $user.Id -MailFolderId 'Inbox' -ErrorAction Stop
		$test = $user.Mail
		write-host "####### Reading emails for mailbox " -nonewline
		write-host $test -foreground red -nonewline
		write-host " ##########"
		write-host "Found " -nonewline
		write-host $mailbox.Length -foreground red -nonewline
		write-host " email(s) "
		foreach ($message in $mailbox) {
			# Print the message subject and received date
			Write-Output (" ----------------------------------------------------")
			Write-Output ("Subject: " + $message.Subject)
			Write-Output ("Received: " + $message.ReceivedDateTime)
			$body = $message.Body.Content -replace '<[^>]+>',''
			$body = $body.trim()
			Write-Output ("Body: " + $body)
		}
	write-host "`n"
	}
	catch
	{
		$err_string = $_ | Out-String
	}
	if ($err_string -inotmatch "The mailbox is either inactive, soft-deleted, or is hosted on-premise")
	{
		Write-Host $err_string
	}
}
# Disconnect from Microsoft Graph
Disconnect-MgGraph
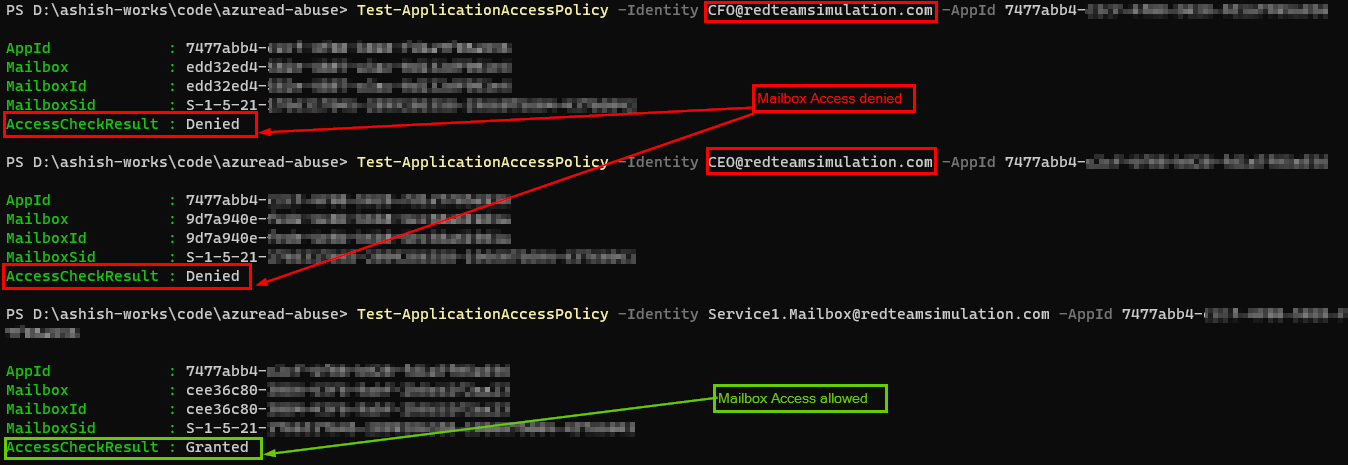
Limiting access to only certain mailboxes
Below powershell will : a) Create a mail-enabled security group with the mailbox we want to only allow to be accessed from the app. b) Create an application access policy for the app with access restricted to only the mail enabled group created in step a)
In my tests, the application access policy took effect in 60-90 minutes and after that accessing other mailboxes would give an error. Below is the output running the same script as above.
Midnight blizzard attack on Microsoft involved abuse of permissions on Azure AD/OAuth apps. Therefore, Its important to take stock of all the apps and their permissions and evaluate if we need those permissions and reduce them if we can.
Per the post, the attacker abused Office 365 Exchange Online full_access_as_app role, which allows access to mailbox. However, Microsoft Graph API also allows an app to use privileged mail.read/mail.write/mail.readwrite which can be abused to have similar effect.
This post has details on how to get all the apps and their permissions and potential way to prevent/detect.
What are Azure AD / Entra ID apps
On a high level, you can use Azure AD app to access any resources in Azure and M365 and that includes emails as well.
When you create an Azure AD application, you’re essentially registering your application with Azure AD, obtaining an application ID (also known as client ID) and optionally a client secret or certificate for authentication purposes and permissions to authorize them to access resources. This allows your application to authenticate users against Azure AD and access resources on behalf of those users.
Because attackers can abuse the high privileged permissions on Azure AD app to access Azure/M365 , It’s important to govern the apps and their permissions and below are few ways :
Get all the Azure AD apps and their permissions
Do we even need that “prod” Azure AD app?
Do we really need those permissions on the “prod” Azure AD app?
Apply conditional access policy on the apps e.g. IP restriction
Apply restrictions on domain users to register Azure AD/Entra apps
Understand roles and users in those roles which can manage Azure AD applications
Splunk monitoring and detection
Get all the Azure AD apps and their permissions
Powershell script to export all the azure AD apps and their permissions
Install the Azure AD module. install-module azuread
Permission Type (“Role” means application permissions and “Scope” means delegated permissions
Splunk output
If you are using Splunk and using ingesting the activity logs from M365 using Splunk Add-On for Microsoft 365, you can use below query to get all the app role assignments.
 index="o365" Operation="Add app role assignment to service principal."
| spath path=ModifiedProperties{}.NewValue output=NewValues
| spath path=Target{}.ID output=NewTargetValues
| eval _time = strptime(CreationTime, "%Y-%m-%dT%H:%M")
| eval AppName = mvindex(NewValues, 6)
| eval perm = mvindex(NewValues, 1)
| eval permdesc = mvindex(NewValues, 2)
| eval target = mvindex(NewTargetValues, 3)
| table _time, AppName, perm, target
| stats values(perm) as AllAPIPermissions, values(target) as API by AppName
Using MSIdentityTools
Mr. Merill Fernando [Principal Product Manager, Entra ] released a fantastic video for the update in the MSIdentityTool to generate the apps and permissions. Works like a charm.
Do we even need that “prod” Azure app?
Now that you have the list of the apps from the script above, you want to chedk if the apps in the list are even being used. Login to Microsoft Entra Admin Center > Monitoring & Health > Service Principal sign-ins > Filter for last 7 days If its a production app, and if they are not in the sign-in events screen for last 7 days, you want to ask the app owners if this app is needed any more. Get the email confirmation and remove the app.
Do we really need those permissions on the “prod” Azure AD app?
Sometimes, apps are assigned permissions which they really dont need. For example, mail.send/mail.read/mail.readwrite are assigned to an app to work with couple of mailboxes. However, the permissions are meant to work with ALL mailboxes and can be abused by an attacker.
Azure AD apps do not honor the conditional access policies to enforce IP restriction, for example. A potential solution is to use Microsoft Entra Workload ID premium feature.
Apply restrictions on domain users to register Azure AD/Entra apps
Login to Azure portal > Microsoft Entra ID > User settings. Ensure the “User can register applications” is set to “No”.
This takes out the risk of a domain user registering an app and giving it permissions – although an admin still needs to grant consent on it. Having said that, even with the above setting in place there are roles which can register applications. An example below is role “Application developers”.
This is another reason why best security practices should need to be applied for the privileged roles.
Understand roles and users in those roles which can manage Azure AD applications
Apart from the “Application developer” role which can register Azure AD apps, below two are privileged roles which can add/update credentials to an existing Azure AD apps as well. So, if the attacker compromises users in the below roles, they can quickly escalate privileges by adding credentials to an existing Azure AD app which has high privileges like full_access_as_app role or mail.read/send and exfilter emails out of mailboxes.
Therefore, we should be careful assigning these roles and if absolutely needed ensure they arew cloud-only accounts with MFA turned on.
Identifying the servers hosting critical applications in your environment is crucial so that alerts for unusual events on those servers are put on higher priority for your security operations team.
One of the approaches we can take to identify the critical assets is by leveraging the load balancer. This could be a head start to build a mini-CMDB (Configuration Management Database) for assets for your sec ops team.
Below is an over-simplified example of network architecture showing a critical web app named “example.com” web app hosted by 5 servers which are load balanced on F5 (VIP : 172.22.23.11). Out of the 5 servers, only 3 servers are active.
In this example, the goal is to get the active servers behind the VIP.
I wrote a PowerShell script to get all the active servers behind all the active VIPs on the a given load balancer.
Why this approach?
If the server is hosting an app which is critical, It has to be load balanced.
If a new server is added to an existing VIP, this script will get it.
If a server is decommissioned, It would be inactive to the load balancer and therefore the script will ignore it.
If the script is scheduled to run periodically, we will have an up-to-date list of servers which are running critical applications. That list can be integrated with SIEM to prioritize alerts from the those servers.
The script
The PowerShell script makes use of PowerShell cmdlet for F5 which can be downloaded from the below location. https://devcentral.f5.com/d/microsoft-powershell-with-icontrol?download=true The downloaded file is a .zip file. You copy to your local folder, unzip it and run .\setupSnapin.ps1 which is unzipped file. You may get an error :
Could not load file or assembly iControlSnapin.dll or one of its dependencies. Operation is not supported. (Exception from HRESULT: 0x8013515
Make sure the “Unblock” is checked from all the files in the unzipped file including “setupSnapin.ps1”
.\setupSnapin.ps1 should work fine now.
Below is the script. You will need to change the F5 IP address and the partition name where the virtual servers reside. The output of the script is saved to a file named “ServerList.csv”
Add-PSSnapIn iControlSnapIn

function GetPoolMembers($poolname,$virtual_server_name_only,$virtual_ip)
{

	$poolmembers = $ic.LocalLBPool.get_member_v2(@($poolname))

	$test = $poolmembers[0]
	write-output($poolname)
	write-output ('Backend servers and ports :')
	$member_status = $ic.LocalLBPool.get_member_object_status($poolname,$poolmembers)

	$node_index = 0
	foreach($poolmember in $test)
	{
		$availability_status = $member_status[0][$node_index].availability_status
		if($availability_status -eq "AVAILABILITY_STATUS_GREEN")
		{
			$ip_address = $poolmember[0].address.replace($active_folder,"").replace("/","")
			write-output($ip_address )
			$global:server_node_details += $ip_address+","+$virtual_server_name_only + "," + $virtual_ip +"`n"
			write-output($global:server_node_details)

		}
		$node_index = $node_index + 1
	}

	write-output $global:server_node_details
}

$global:server_node_details = "sep=,"+"`n"
$global:server_node_details += "Server IP,F5 Virtual IP,F5 Virtual Server Name" +"`n"

$connection = Initialize-F5.iControl -Hostname <Your F5 IP Address> -Credentials (Get-Credential)
$ic = Get-F5.iControl


# Set the active folder aka partitions where you know the virtul servers exist
$active_folder = "/YourPartitionName/"
$ic.SystemSession.set_active_folder($active_folder)

# get list of all the virtual servers
$virtual_server_list = $ic.LocalLBVirtualServer.get_list()
$virtual_server_with_server_side_profile = @()
foreach($virtualserver in $virtual_server_list)
{

	$object_status = $ic.LocalLBVirtualServer.get_object_status($virtualserver).availability_status

	if($object_status -eq "AVAILABILITY_STATUS_GREEN")
	{
		$virtual_server_name_only = $virtualserver.replace($active_folder,"")
		write-output ('Virtual server name ' + $virtualserver)
		write-output ($object_status)
		$addresses = $ic.LocalLBVirtualServer.get_destination_v2($virtualserver)
		write-output($addresses.Length)
		$virtual_ip = $addresses[0].address.replace($active_folder,"")
		write-output('Virtual IP address : ' + $virtual_ip )
		$pool_name = $ic.LocalLBVirtualServer.get_default_pool_name($virtualserver)
		GetPoolMembers $pool_name $virtual_ip $virtual_server_name_only
	}

}

$global:server_node_details | Out-File -FilePath .\ServerList.csv
The output The script output has 3 columns for each server in with Its Virtual IP and Virtual server name. Virtual server name is an identifier for the Virtual IP address on the load balancer. That name provides an indication of what that server is used for. This approach groups servers by their Virtual server name and saves identifying each server for what it is used for.
In the below hypothetical example for the output, servers 172.22.1.1, 172.22.1.2 and 172.22.1.3 running example.com web app.